vue-router 源码解析 | 1.3w 字 | 多图预警 - 【上】
- 各位好,我是光辉 😎
vue-router是每个vue开发者都会接触到的一个插件- 本着追本溯源的理念,我开启了
vue-router源码分析之路 😂 - 天天加班,所以前前后后花了好几个月时间
- 时间拖的很长,所以可能存在思路不连贯的情况,还望见谅 🤣
- 由于掘金字数限制,所以分为上中下三篇来介绍
- 上篇即本篇,主要介绍了前端路由的设计思路及实现基本原则、
vue-router的相关术语、目录结构、安装、实例化、初始化相关实现 - 中篇介绍了其核心特性路由匹配、导航守卫触发的机制
- 下篇为收尾篇,介绍了一些非核心特性,如滚动处理、
view,link组件的实现 - 第一次做源码解析,肯定有很多错误或理解不到位的地方,欢迎指正 🤞
- 项目地址
https://github.com/BryanAdamss/vue-router-for-analysis- 如果觉得对你有帮助,记得给我一个
star✨
- uml 图源文件
https://github.com/BryanAdamss/vue-router-for-analysis/blob/dev/vue-router.EAP
- 关联文章链接
设计思路
- 在解析
vue-router这个路由库前,我们要了解什么是路由,什么是前端路由?实现前端路由的常规套路是什么?
什么是前端路由
- 关于路由的定义,维基是这样定义的;
路由(routing)就是通过互联的网络把信息从源地址传输到目的地址的活动。路由发生在OSI网络参考模型中的第三层即网络层。路由引导分组转送,经过一些中间的节点后,到它们最后的目的地。作成硬件的话,则称为路由器。路由通常根据路由表——一个存储到各个目的地的最佳路径的表——来引导分组转送 - 上面的定义可能很官方,但是我们可以抽出一些重点
- 路由是一种活动,负责将信息从源地址传输到目的地址;
- 要完成这样一个活动需要一个很重要的东西路由表-源地址和目标地址的映射表
在web后台开发中,“route”是指根据url分配到对应的处理程序。;引用自https://www.zhihu.com/question/46767015@贺师俊- 用户输入一个 url,浏览器传递给服务端,服务端匹配映射表,找到对应的处理程序,返回对应的资源(页面 or 其它);
- 对于前端来说,路由概念的出现是伴随着
spa出现的;在spa出现之前,页面的跳转(导航)都是通过服务端控制的,并且跳转存在一个明显白屏跳转过程;spa出现后,为了更好的体验,就没有再让服务端控制跳转了,于是前端路由出现了,前端可以自由控制组件的渲染,来模拟页面跳转 - 小结
- 服务端路由根据
url分配对应处理程序,返回页面、接口返回 - 前端路由是通过
js根据url返回对对应组件
- 服务端路由根据
如何实现前端路由
- 看了上面的定义,要实现路由,需要一个很重要的东西-路由映射表;
- 服务端做路由页面跳转时,映射表的反映的是
url和页面的关系 - 现在前端基本走模块化了,所以前端的路由映射表反映的是
url和组件的关系
- 服务端做路由页面跳转时,映射表的反映的是
- 就像下面的伪代码一样
1 | // 使用es6 map |
- 有了映射表,我们就知道
url和组件的映射关系; - 但是,映射表维护的只是一个关系,并不能帮我们完成,访问
/bar,返回Bar组件这样一个流程,所以我们还需要一个匹配器,来帮我们完成从url到组件的匹配工作; - 是不是有了
路由映射表和匹配器就可以实现前端路由了呢? - 我们的
spa是运行在浏览器环境中的,浏览器是有前进、返回功能的,需要我们记录访问过的url;- 我们知道,要实现这种类似
撤销、恢复的功能,肯定需要使用到一种数据结构-栈(stack);每访问一个url,将url,push到栈中,返回时,执行pop即可拿到上一次访问的url - 好在浏览器平台,已经给我们提供了这样的栈,无需我们自己实现,我们只需要去调用它的接口window.history实现功能即可
- 我们知道,要实现这种类似
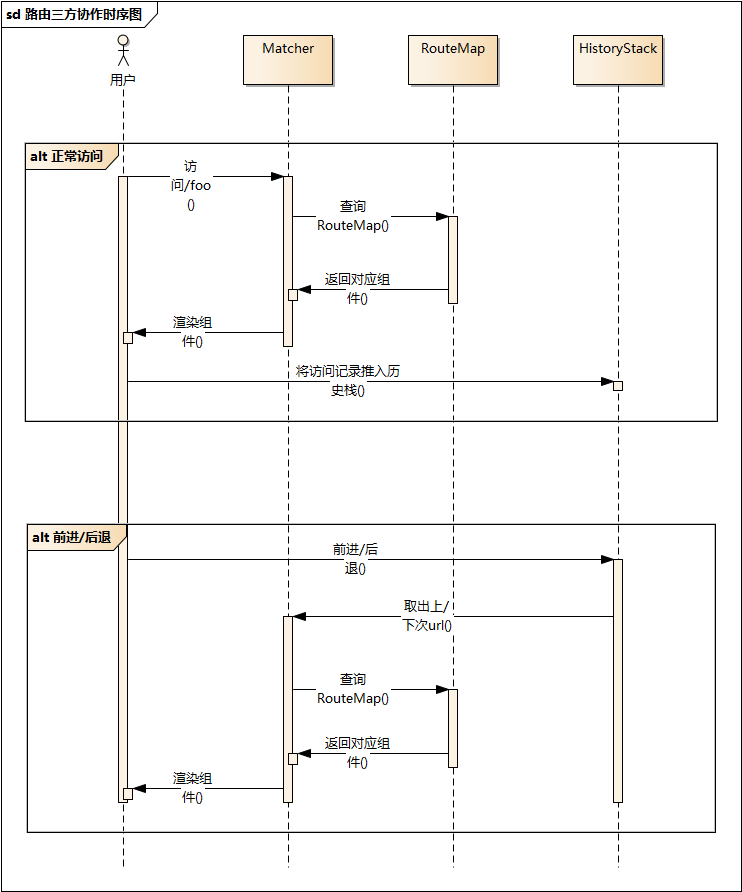
- 画了个图,描述了下三者协作关系
- sequence.png
- sequence.png
- 当我们访问某个 url 时,如
/foo,匹配器会拿着/foo去路由映射表中去查找对应的组件,并将组件返回渲染,同时将访问记录推入历史栈中 - 当我们通过前进/后退去访问某个
url时,会先从历史栈中找到对应url,然后匹配器拿url去找组件,并返回渲染;只不过,这是通过前进/后退实现访问的,所以不需要再推入历史栈了
总结
- 要实现一个前端路由,需要三个部分
- 路由映射表
- 一个能表达
url和组件关系的映射表,可以使用Map、对象字面量来实现
- 一个能表达
- 匹配器
- 负责在访问
url时,进行匹配,找出对应的组件
- 负责在访问
- 历史记录栈
- 浏览器平台,已经原生支持,无需实现,直接调用接口
- 路由映射表
- 现在不用纠结他们的具体实现,你只需要知道有这三个东西,并且他们大概是如何协作的就可以了;
- 后面我们将一起看看
vue-router如何利用他们实现前端路由的
术语
- 在分析
vue-router源码前,我们先了解下vue-router中常出现的一些概念术语,如果理解起来吃力,可以先跳过,后面遇到,再回来看;
路由规则、配置对象(RouteConfig)
- 路由的配置项,用来描述路由
- 下图红框里面标出来的都是路由配置对象
- route-config.png
- 因为
vue-router是支持嵌套路由的,所以配置对象也是可以相互嵌套的 - 完整的形状如下
1 | interface RouteConfig = { |
路由记录(RouteRecord)
- 每一条路由规则都会生成一条路由记录;嵌套、别名路由也都会生成一条路由记录;是路由映射表的组成部分
1 | const record: RouteRecord = { |
路由对象(Route)
Route表示当前激活的路由的状态信息,包含了当前URL解析得到的信息,还有URL匹配到的路由记录们 (route records)。https://router.vuejs.org/zh/api/#路由对象
- 注意,这说明一个
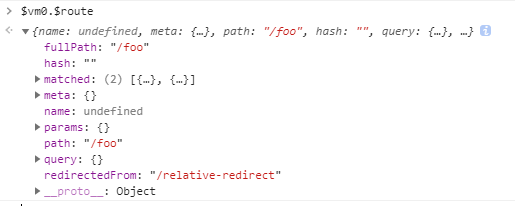
Route可以关联多个RouteRecord - 通过
this.$route访问到的就是Route对象 - route.png
- 路由对象是不可变 (
immutable) 的,每次成功的导航后都会产生一个新的对象
位置(Location)
- 它并不是
window.location的引用,vue-router在内部定义了一个Location,是一个用来描述目标位置的对象; $router.push/replace、router-link的to接收的就是Location对象https://router.vuejs.org/zh/api/#to
vue-router内部可以将一个url string转换成Location对象,所以确切的说$router.push/replace、router-link的to接收的都是一个RawLocation对象RawLocation对象是String和Location的联合类型
1 | export type RawLocation = string | Location |
路由组件(RouteComponent)
- 当路由成功匹配时,就需要在
router-view渲染一个组件,这个需要被渲染的组件就是路由组件 RouteConfig中component、components中定义的vue组件就是路由组件- 路由组件的特殊性
- 拥有只在路由组件中生效的守卫(
beforeRouteEnter 、beforeRouteUpdate、beforeRouteLeave) - 你是否跟我一样,曾经在组件中调用
beforeRouteEnter发现没有生效,那是因为这个守卫只能在路由组件中被调用,在所有非路由组件中都不会被调用,包括路由组件的后代组件;你如果想在路由组件中实现beforeRouteEnter类似守卫监听效果,可以通过watch $route来手动判断
- 拥有只在路由组件中生效的守卫(
- 红框标记出来的是
路由组件 - route-component.png
- 看完上面的术语,你可能还是云里雾里的,没事,后面会详解,现在你只需要有个大概了解即可;
环境
vue-router版本:v3.1.6node版本:v8.17.0- 分析仓库地址:
https://github.com/BryanAdamss/vue-router-for-analysis- 划重点
- 注意查看
commit记录,commit记录了我整个分析的流程 - 如果你觉得还可以,不要忘记
star、fork🤞
- 注意查看
- 划重点
目录结构
- 首先我们将
vue-router仓库clone下来,看下目录结构大概是什么样的 git clone git@github.com:BryanAdamss/vue-router-for-analysis.git
目录
- 可以看到会有如下目录
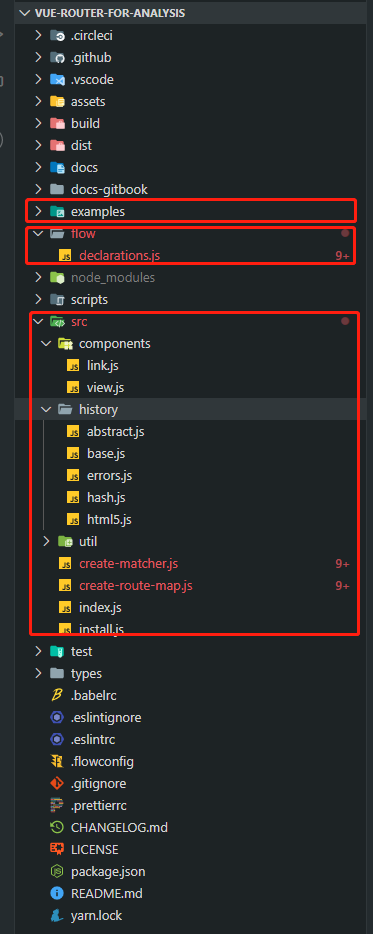
- directory.png
- 别看目录多么多,其实我已经给你划了重点
- 我们其实只需要关注下面几个目录或文件
examples- 这里面存放了官方精心准备的案例
- 不仅告诉你
vue-router有哪些基础特性,还会告诉你怎么应对一些复杂场景,例如权限控制、动态添加路由等;总之,值得你去一探究竟; - examples.png
- 另外,我们在分析源码的时候,还可以利用这些例子进行调试
- 在源码你想调试处添加
debugger断点标识,然后启动例子npm run dev,打开localhost:8080即可
- 在源码你想调试处添加
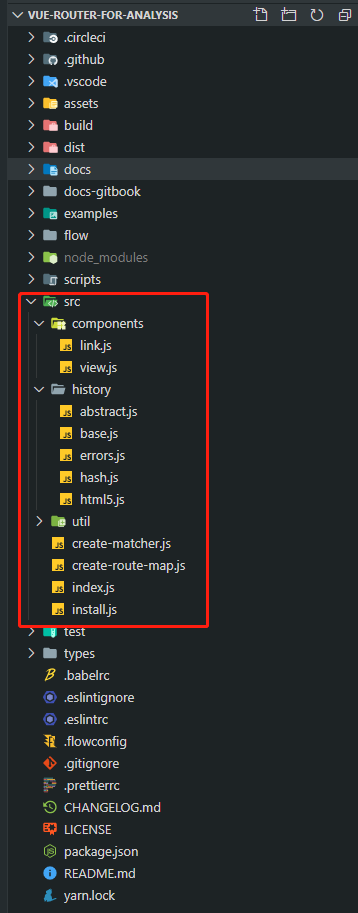
src目录- 这是
vue-router源码存放的目录,是我们需要重点关注的地方 - src.png
- 捡几个重要目录先说下
components目录是存放内置组件router-link、router-view的history是存放核心history类的地方util中存放的是一些辅助函数index.js是vue-router的入口文件,也是vue-router类定义的地方install.js是安装逻辑所在文件
- 这是
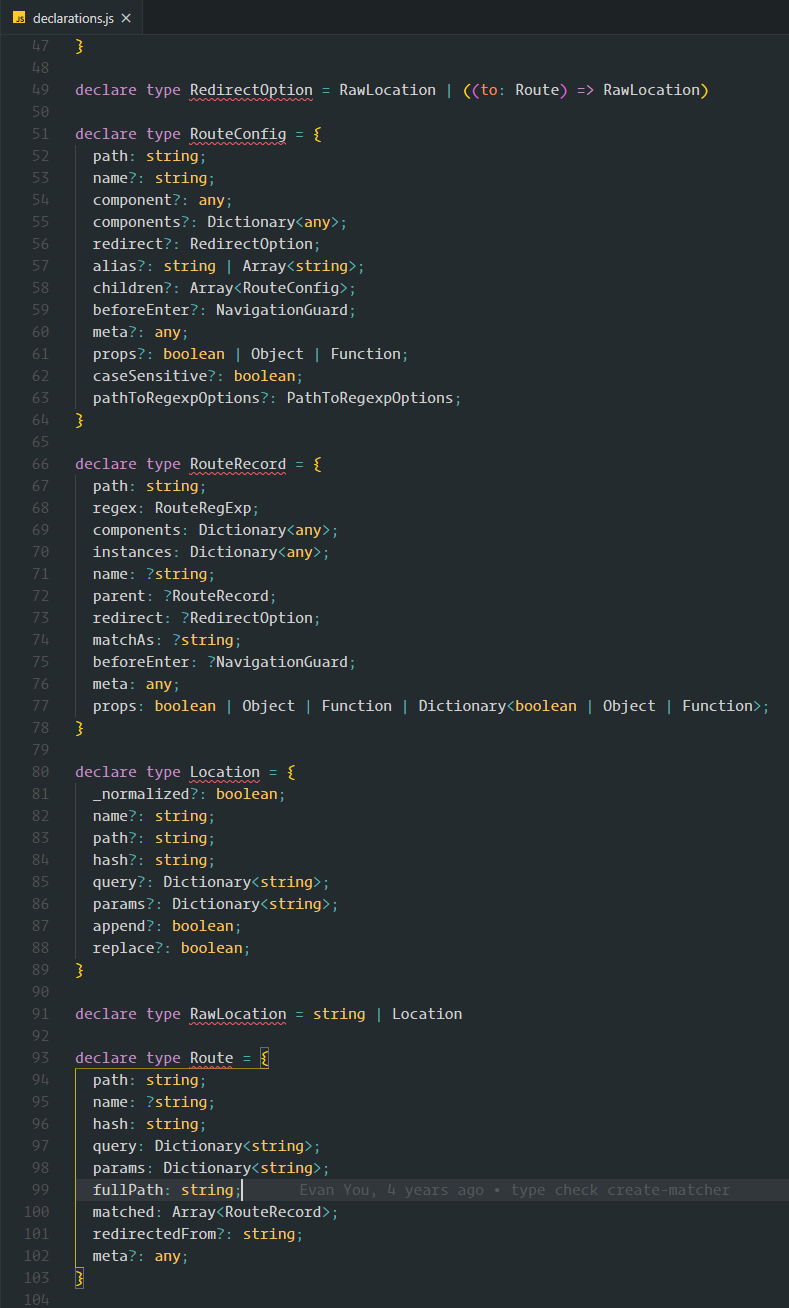
flow/declarations.js- 它是
vue-router的 flow 类型声明文件,通过它我们能知道vue-router中几个核心类(对象)是长什么样的 - 它里面,大概长这样
- declarations.png
- 它是

基础例子
- 我们从最基础的例子开始看
1 | import Vue from 'vue' |
- 可以看到,首先使用
vue的插件语法安装了vue-router; 然后我们再实例化VueRouter; 最后我们将VueRouter的实例注入到Vue - 这其实就涉及到三个核心流程:安装、实例化、初始化
- 我们先从这三个流程讲起
安装流程
- 我们知道,只要是
vue plugin,肯定都会有一个install方法; - 上面也提到
vue-router的入口文件在src/index.js中,那我们去index.js中找找install方法
1 | // src/index.js |
- 可以看到,开头导入了
install方法,并将其做为静态方法直接挂载到VueRouter上,这样,在Vue.use(VueRouter)时,install方法就会被调用; - 可以看到,如果在浏览器环境,并且通过
script标签的形式引入Vue时(会在window上挂载Vue全局变量),会尝试自动使用VueRouter - 我们接下来看看
install.js中是什么
install.js
install方法并不长
1 | import View from './components/view' |
- 可以看到,
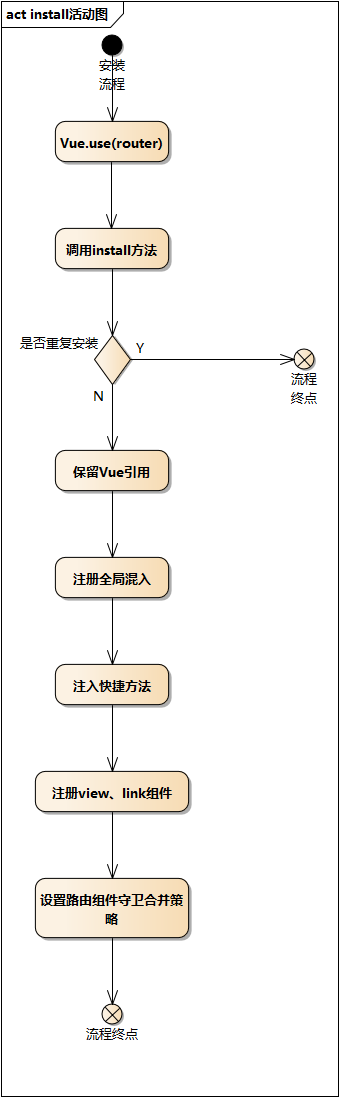
install方法干了下面几件事
避免重复安装
- 通过添加
installed标识来判断是否重复安装
保留Vue引用,避免将Vue做为依赖打包
install方法被调用时,会将Vue做为参数传入,Vue会被赋值给事先定义好的_Vue变量- 在其它模块中,可以导入这个
_Vue,这样既能访问到Vue,又避免了将Vue做为依赖打包 - 这是一个插件开发实用小技巧
注册了一个全局混入
- 这个混入将影响注册之后所有创建的每个
Vue实例,也就是后面每个Vue实例都会执行混入中的代码 - 我们看下混入中的代码
1 | // 注册全局混入 |
- 它注册了两个生命周期钩子
beforeCreate和destroyed; - 注意
- 在这两个钩子中,
this是指向当时正在调用钩子的vue实例; - 这两个钩子中的逻辑,在安装流程中是不会被执行的,只有在组件实例化时执行到钩子时才会被调用
- 在这两个钩子中,
- 我们先看
beforeCreate钩子 - 它先判断了
this.$options.router是否存在,我们在new Vue({router})时,router已经被保存到到Vue根实例的$options上,而其它Vue实例的$options上是没有router的- 所以
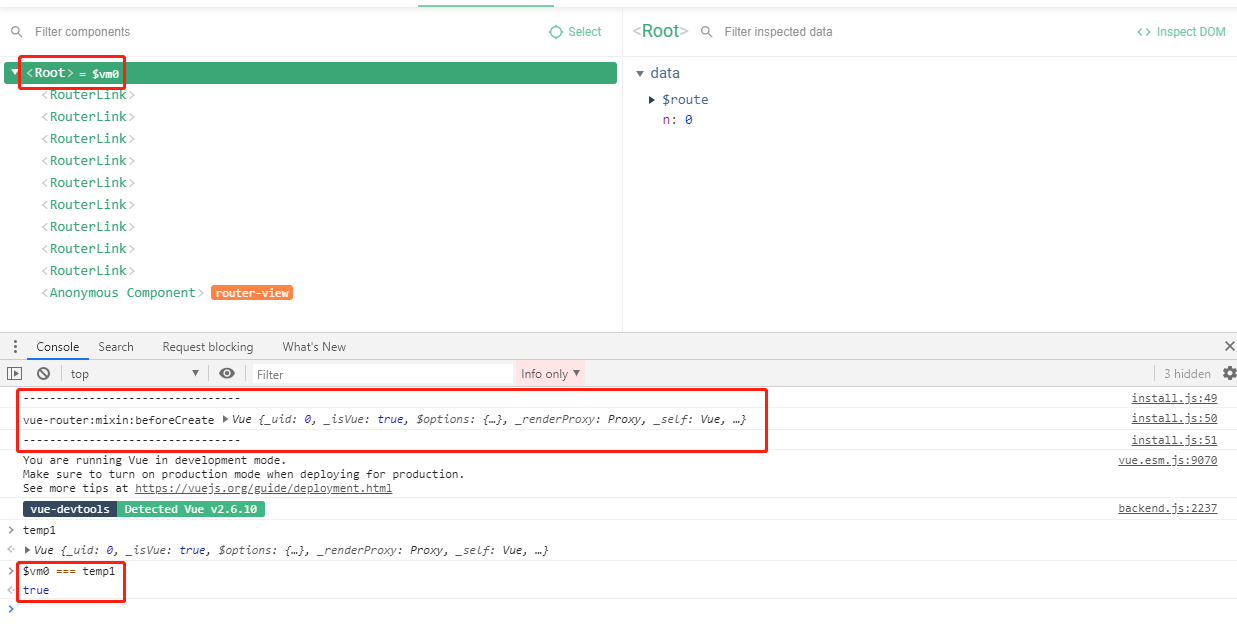
if中的语句只在this === new Vue({router})时,才会被执行,由于Vue根实例只有一个,所以这个逻辑只会被执行一次 - 我们可以在
if中打印this并结合调试工具看看 - root-instance.png
- 的确,
if中的逻辑只执行了一次,并且this就是指向Vue根实例
- 所以
- 我们看下
if中具体干了什么- 在根实例上保存了
_routerRoot,用来标识router挂载的Vue实例 - 在根实例上保存了
VueRouter实例(router) - 对
router进行了初始化(init)router初始化逻辑我们后面细看
- 在根实例上,响应式定义了
_route属性- 保证
_route变化时,router-view会重新渲染,这个我们后面在router-view组件中会细讲
- 保证
- 在根实例上保存了
- 我们再看下
else中具体干了啥- 主要是为每个组件定义
_routerRoot,采用的是逐层向上的回溯查找方式
- 主要是为每个组件定义
- 我们看到还有个
registerInstance方法,它在beforeCreate、destroyed都有被调用,只是参数个数不一样- 在
beforeCreate中传入了两个参数,且都是this即当前vue实例,而在destroyed中只传入了一个vue实例 - 我们在讲
router-view时会细讲,你只需要知道它是用来为router-view组件关联或解绑路由组件用的即可 - 传入两个参数即关联,传入一个参数即解绑
- 在
添加实例属性、方法
- 在
Vue原型上注入$router、$route属性,方便在vue实例中通过this.$router、this.$route快捷访问
注册 router-view、router-link 全局组件
- 通过
Vue.component语法注册了router-view和router-link两个全局组件
设置路由组件守卫的合并策略
- 设置路由组件的
beforeRouteEnter、beforeRouteLeave、beforeRouteUpdate守卫的合并策略
总结
- 我们用一张图,总结一下安装流程
- install.png
实例化流程
- 看完安装流程,我们紧接着来看下
VueRouter的实例化过程 - 这一节,重点关注实例化过程,所以我们只看
constructor中的核心逻辑
VueRouter 的构造函数
- 我们打开
src/index.js看下VueRouter构造函数
1 | // src/index.js |
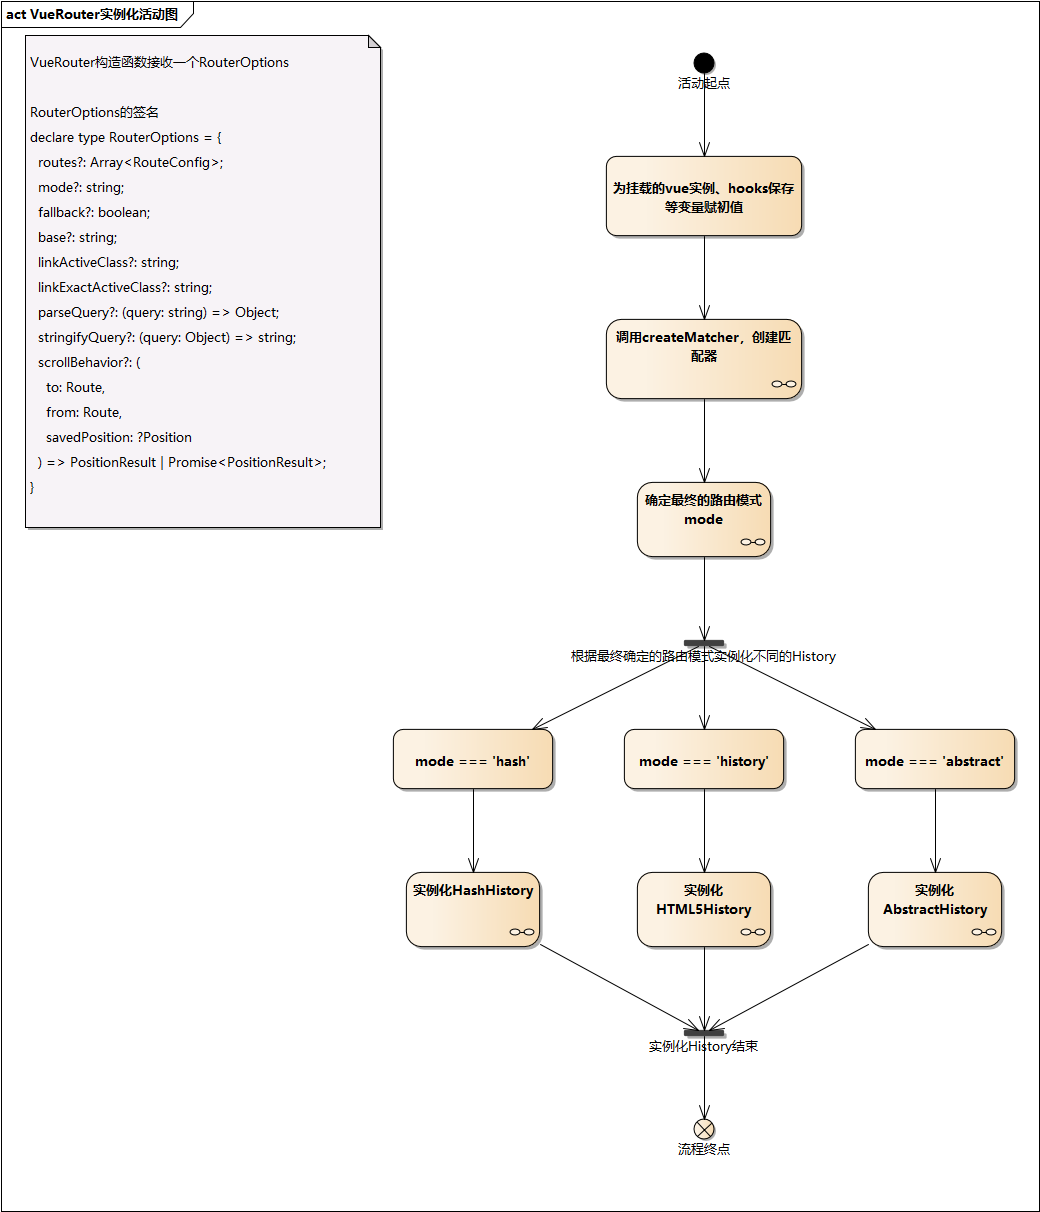
- 构造函数主要干了下面几件事
接收 RouterOptions
- 可以看到,构造函数接收一个
options选项对象,它的类型是RouterOptions,我们来看下RouterOptions - 打开
flow/declarations.js
1 | // flow/declarations.js |
RouterOptions定义了VueRouter所能接收的所有选项;- 我们重点关注一下下面的几个选项值
routes是路由配置规则列表,这个主要用来后续生成路由映射表的;- 它是一个数组,每一项都是一个路由配置规则(
RouteConfig),关于RouteConfig,可以回看术语那一节;
- 它是一个数组,每一项都是一个路由配置规则(
mode、fallback是跟路由模式相关的- 后面会详细讲
VueRouter的路由模式
- 后面会详细讲
属性赋初值
- 对一些属性赋予了初值,例如,对接收
全局导航守卫(beforeEach、beforeResolve、afterEach)的数组做了初始化
创建 matcher
- 通过
createMatcher生成了matcher - 这个
matcher对象就是最初聊的匹配器,负责 url 匹配,它接收了routes和router实例;createMatcher里面不光创建了matcher,还创建了路由映射表RouteMap,我们后面细看
确定路由模式
- 三种路由模式我们后面细讲
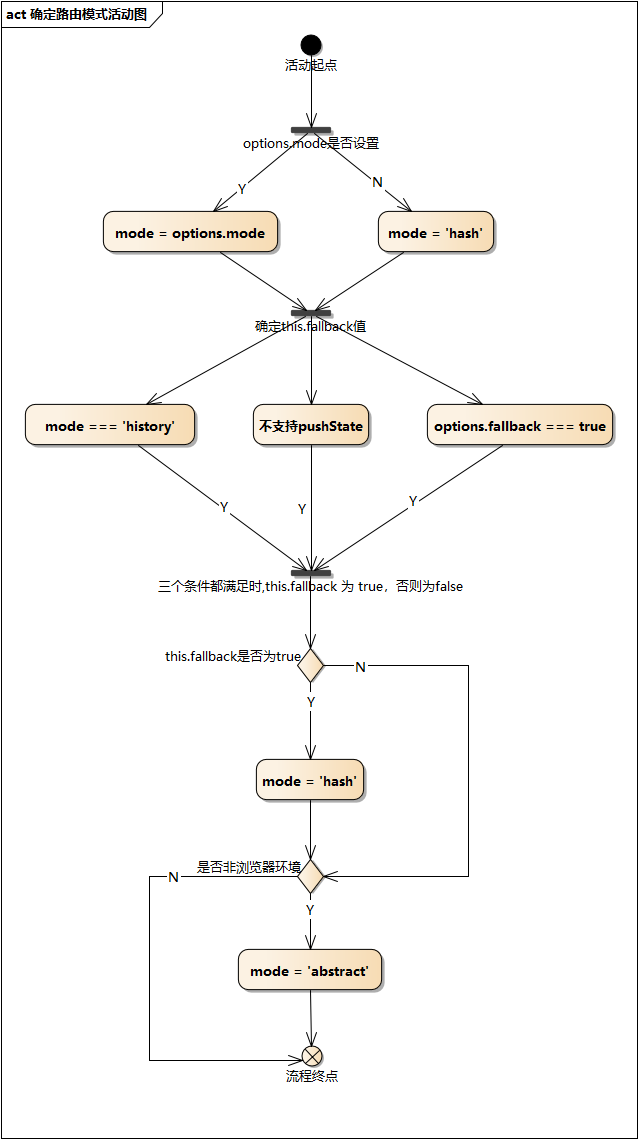
- 现在只需要知道
VueRouter是如何确定路由模式的 VueRouter会根据options.mode、options.fallback、supportsPushState、inBrowser来确定最终的路由模式- 先确定
fallback,fallback只有在用户设置了mode:history并且当前环境不支持pushState且用户主动声明了需要回退,此时fallback才为true - 当
fallback为true时会使用hash模式; - 如果最后发现处于非浏览器环境,则会强制使用
abstract模式 - route-mode.png
inBrowser和supportsPushState的实现都很简单
1 | // src/util/dom.js |
根据路由模式生成不同的 History 实例
- 根据上一步的路由模式生成不同的
History实例,关于路由模式、History实例后面再讲
小结
VueRouter的构造函数主要干了下面几件事- 接收一个
RouterOptions - 然后对一些属性赋了初值
- 生成了
matcher匹配器 - 确定路由模式
- 根据不同路由模式生成不同
History实例
- 接收一个
创建匹配器
- 我们来细看一下
createMatcher里面的实现 createMatcher的实现在src/create-matcher.js中
1 | // src/create-matcher.js |
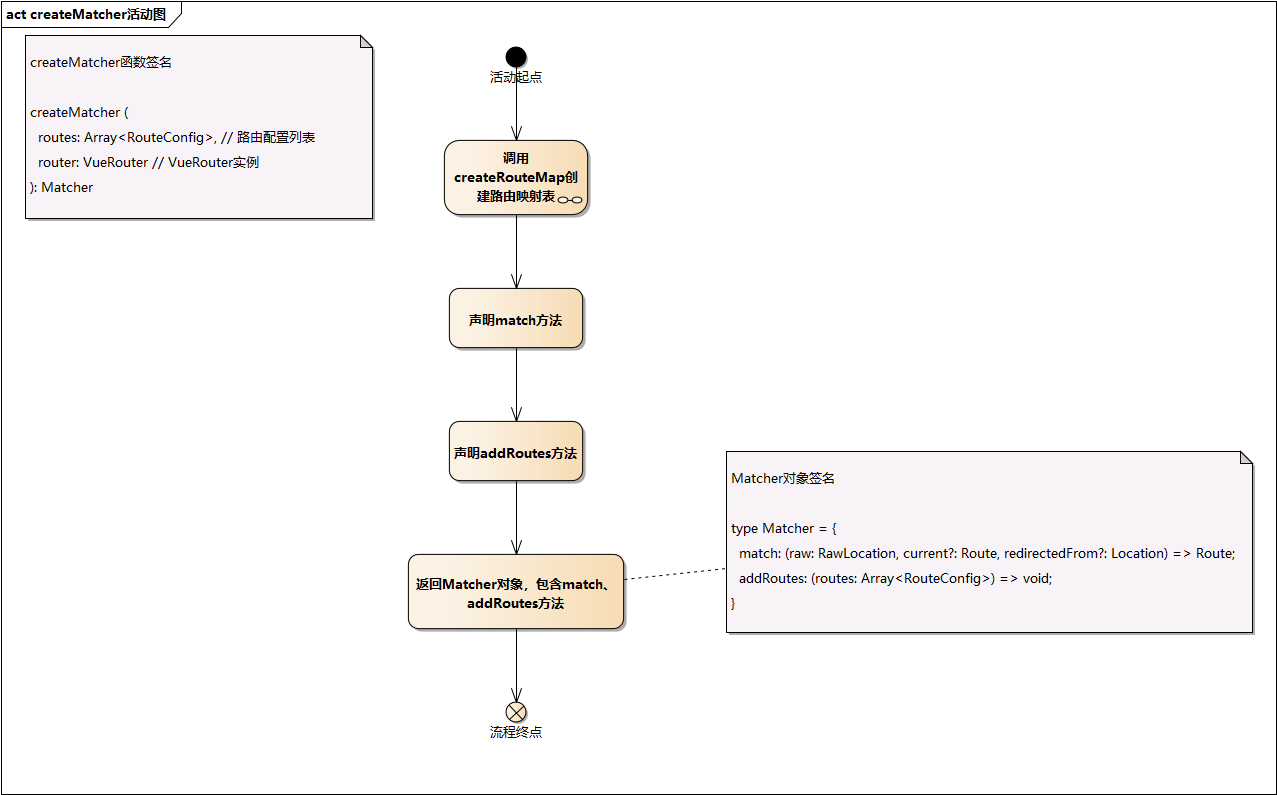
- 可以看到,
createMatcher方法接收一个路由配置规则列表和router实例,返回一个Matcher对象 Matcher对象包含一个用于匹配的match方法和一个动态添加路由的addRoutes方法;- 而这两个方法都声明在
createMatcher内部,由于闭包特性,它能访问到createMatcher作用域的所有变量
- 而这两个方法都声明在
小结
- 我们总结下
createMatcher的逻辑 - create-matcher.png
- 我们可以看到
createMatcher和addRoutes方法中都调用了createRouteMap方法,二者只是传递的参数不同,从方法名看,这个方法肯定和路由表RouteMap有关 - 我们接下来看看
createRouteMap的实现
createRouteMap
createRouteMap方法位于src/create-route-map.js中
1 | // 创建路由映射map、添加路由记录 |
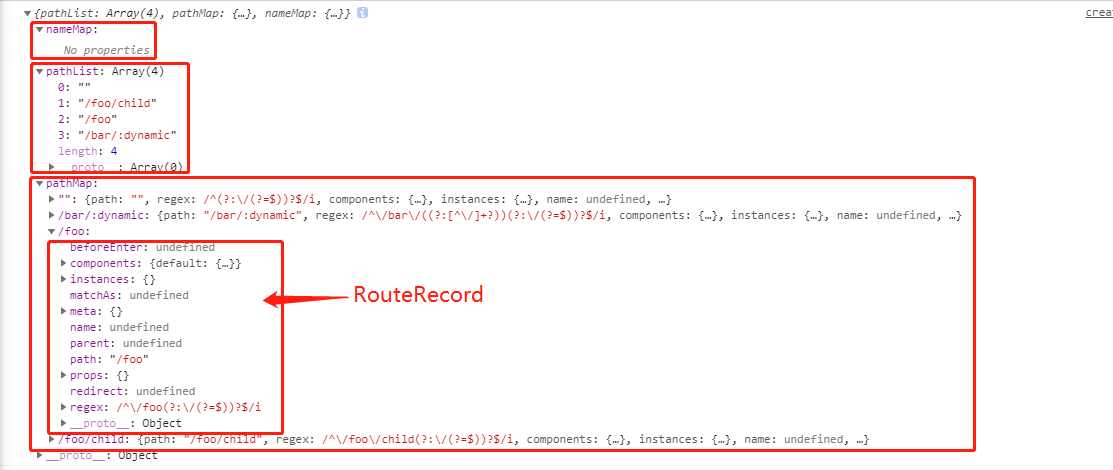
- 可以看到
createRouteMap返回一个对象,它包含pathList、pathMap和nameMap pathList中存储了routes中的所有pathpathMap维护的是path和路由记录RouteRecord的映射nameMap维护的是name和路由记录RouteRecord的映射- 因为
VueRouter支持命名路由
- 因为
- 后两者,都是为了快速找到对应的
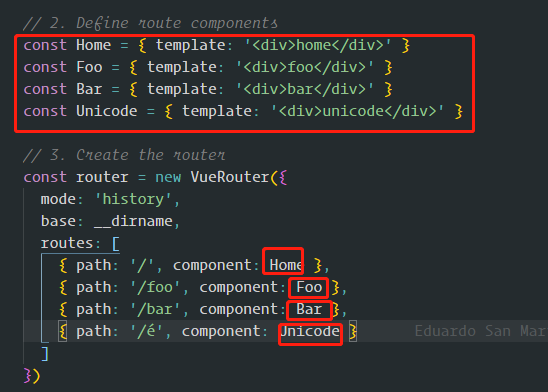
路由记录 - 可以看下使用下面的
routes调用createRouteMap会返回什么
1 | ;[ |
- route-map-obj.png
- 由于没有命名路由,所以
nameMap为空 pathList存储了所有path,有个为空,其实是/,在normalizePath时被删除了pathMap记录了每个path和对应RouteRecord的映射关系
小结
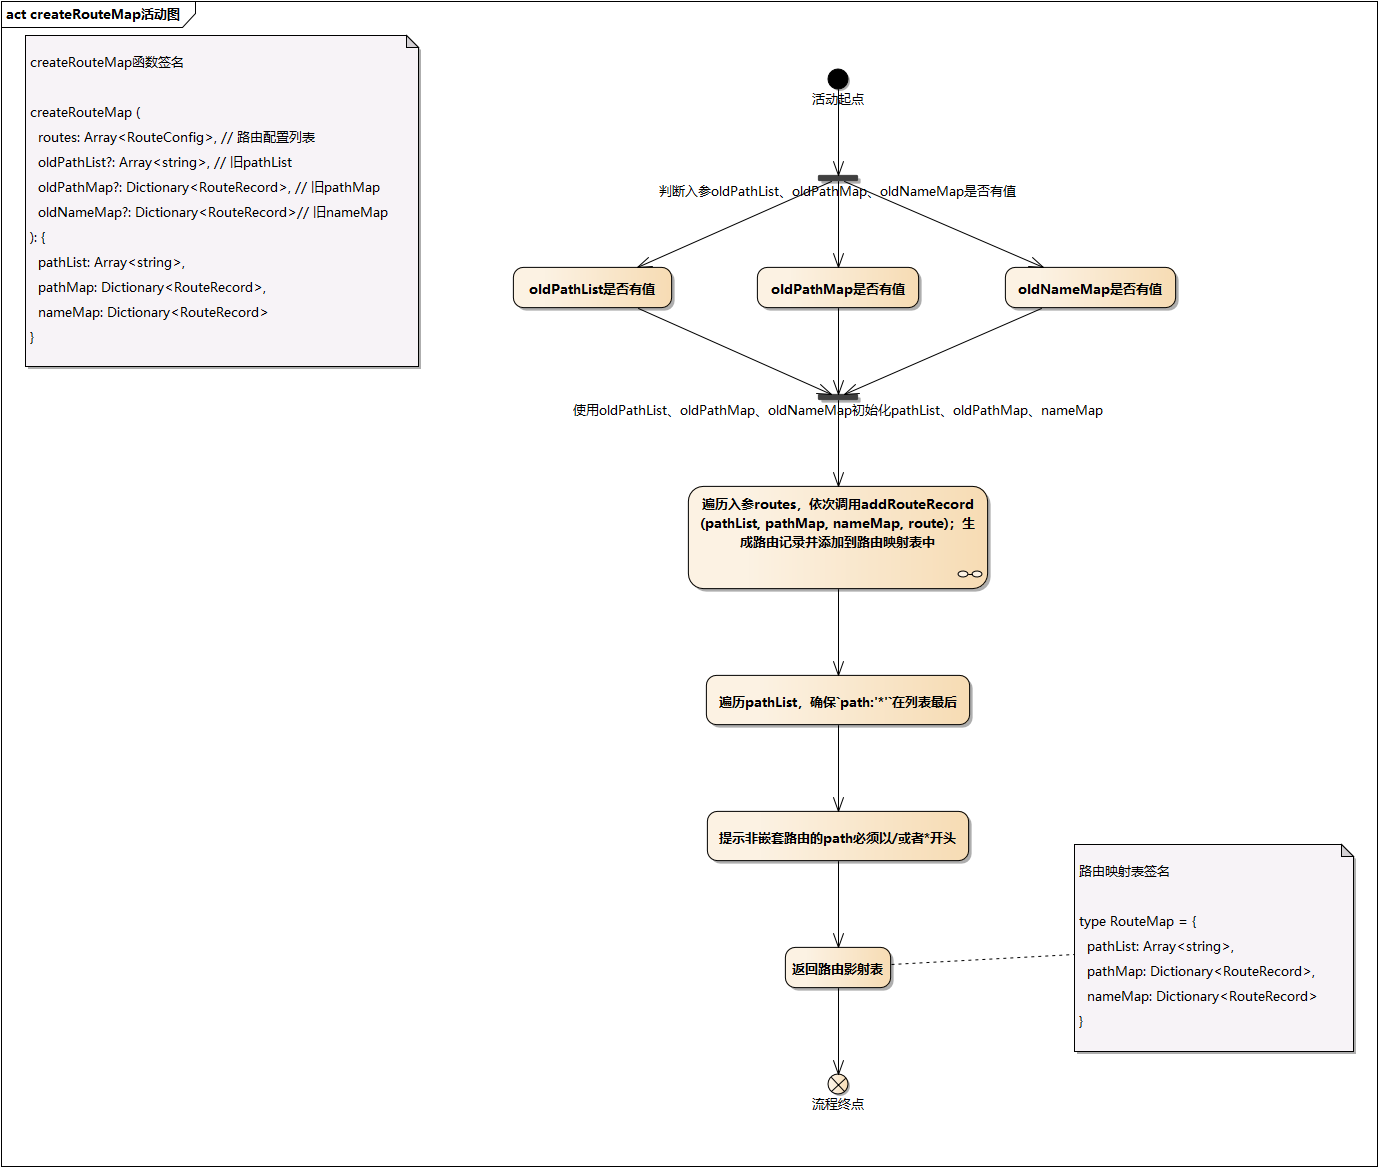
VueRouter的路由映射表由三部分组成:pathList、pathMap、nameMap;后两者是用来快速查找的createRouteMap的逻辑- 先判断路由相关映射表是否已经存在,若存在则使用,否则新建;
- 这就实现了
createRouteMap创建/新增的双重功能
- 这就实现了
- 然后遍历
routes,依次为每个route调用addRouteRecord生成一个RouteRecord并更新pathList、pathMap和nameMap - 由于
pathList在后续逻辑会用来遍历匹配,为了性能,所以需要将path:*放置到pathList的最后 - 最后检查非嵌套路由的
path是否是以/或者*开头
- 先判断路由相关映射表是否已经存在,若存在则使用,否则新建;
- 用图总结如下
- create-route-map-sequence.png
- 接下来,我们看看路由记录是如何生成的
addRouteRecord
- 这个方法主要是创建路由记录并更新路由映射表
- 位于
src/create-route-map.js
1 | // src/create-route-map.js |
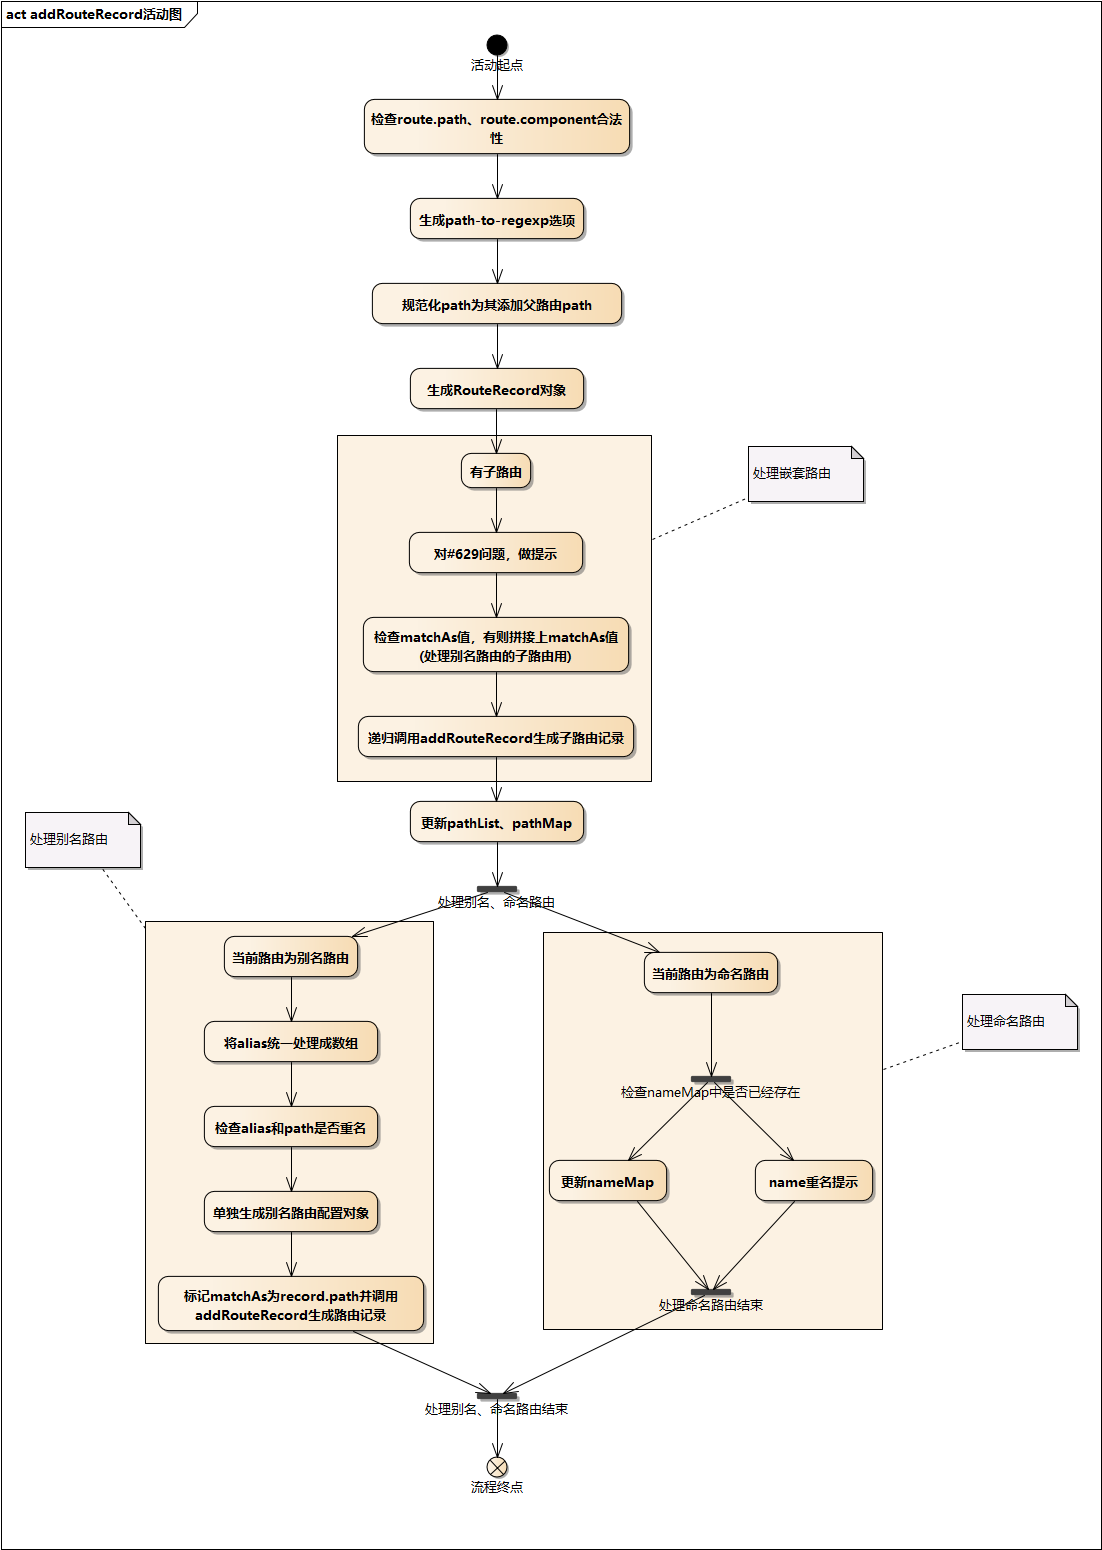
- 看下逻辑
- 检查了路由规则中的
path和component - 生成
path-to-regexp的选项pathToRegexpOptions - 格式化
path,如果是嵌套路由,则会追加上父路由的path - 生成路由记录
- 处理嵌套路由,递归生成子路由记录
- 更新
pathList、pathMap - 处理别名路由,生成别名路由记录
- 处理命名路由,更新
nameMap
- 检查了路由规则中的
- 我们来看下几个核心逻辑
生成路由记录
- 路由记录记录了路由的核心信息
1 | const record: RouteRecord = { |
- 路由记录有个
regex字段,它是一个增强的正则表达式,它是实现动态路由匹配的关键 regex是通过compileRouteRegex方法返回的,它里面调用了path-to-regexp
1 | import Regexp from 'path-to-regexp' |
- 我们看下
path-to-regexp是如何使用的 - 官网是:https://www.npmjs.com/package/path-to-regexp
- Regexp 接收三个参数
path,keys,options;path为需要转换为正则的路径,keys,是用来接收在path中找到的key,可以传入,也可以直接使用返回值上的keys属性,options为选项
1 | const pathToRegexp = require('path-to-regexp') |
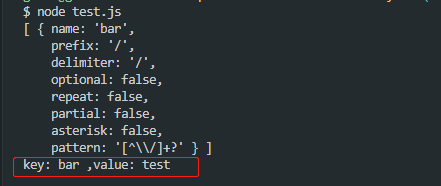
- 通过下面的例子,就可以知道动态路由获取参数值是如何实现的
1 | // test.js |
- path-to-regex-demo.png
生成嵌套路由记录
- 我们知道
vue-router是支持嵌套路由的,我们来看看是如何生成嵌套路由记录的
1 | // src/create-route-map |
- 首先针对
#629问题做出了警告提示#629问题主要是 当一个路由是命名路由 && 未使用重定向 && 子路由配置对象path为''或/时,使用父路由的name跳转时,子路由将不会被渲染
- 然后遍历子路由规则列表,生成子路由记录
- 这里面还处理了别名路由的子路由情况
- 遍历时如果发现父路由被标记为别名路由,则子路由的
path前面需要加上父路由的path,然后再生成记录
- 遍历时如果发现父路由被标记为别名路由,则子路由的
- 这里面还处理了别名路由的子路由情况
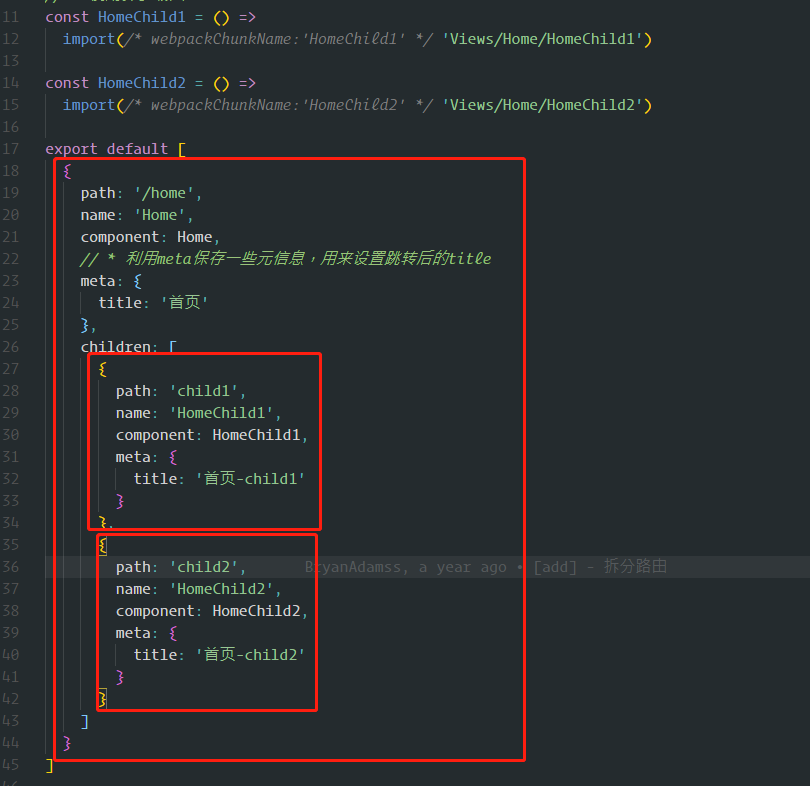
- 我们可以看下下面的嵌套路由,生成的路由映射表长什么样
1 | ;[ |
- nested-route.png
- 可以看到,子路由的
path会前追加上父路由的path

生成别名路由记录
VueRouter支持给路由设置别名;/a的别名是/b,意味着,当用户访问/b时,URL会保持为/b,但是路由匹配则为/a,就像用户访问/a一样- 我们来看看椒如何生成别名路由记录的
1 | // src/create-route-map.js |
- 别名是支持单别名和多别名的,即
route.alias支持传入/foo或['/foo','/bar'],所以先对这两种情况做了归一处理,统一处理成数组 - 然后遍历这个数组,先检查别名和
path是否重复,然后单独为别名路由生成一份配置传入,最后调用addRouteRecord生成别名路由记录- 注意此处还通过
matchAs处理了别名路由生成子路由的场景,主要通过设置matchAs为record.path || '/',然后在生成子路由记录时,会根据matchAs生成别名路由记录的子记录,具体可看上面的嵌套路由章节
- 注意此处还通过
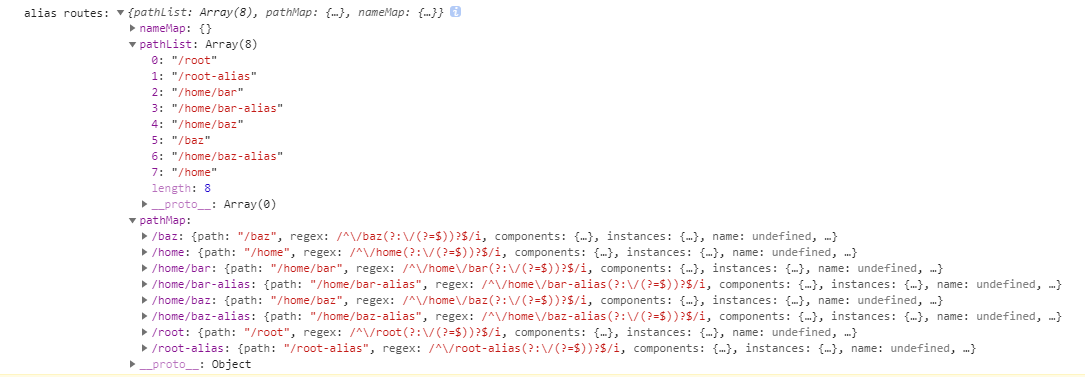
- 我们看看,别名路由生成的的路由映射表长什么样
1 | ;[ |
- alias-route.png
- 可以看到为别名路由和别名路由的子路由都单独生成了一条路由记录
小结
- 路由记录是
路由映射表的重要组成部分- 路由记录中的
regex是处理动态路由传参的关键字段,主要是借助path-to-regexp实现的
- 路由记录中的
- 生成路由记录主要考虑了下面几种路由记录的生成
- 嵌套路由
- 子路由单独生成一条路由记录
- 别名路由及别名路由子路由
- 别名路由及其子路由分别会生成一条路由记录
- 命名路由
- 嵌套路由
- 生成路由记录的整个流程如下图所示
- add-route-record.png
- 至此我们已经分析完了
VueRouter实例化中创建匹配器(生成路由映射表)相关逻辑 - 下面我们将看看根据路由模式生成
History实例的相关逻辑
路由模式
- 前端路由一个很重要的特性是要实现无刷新切换页面
- 即 url 改变,页面不刷新实现页面的跳转
- 要实现这一点,有两种方案
- 一种
hash+hashChange,另一种利用History API的pushState+popState - 前者主要利用
hash改变时页面不会刷新并会触发hashChange这个特性来实现前端路由 - 后者充分利用了
HTML5 History API的pushState方法和popState事件来实现前端路由 - 二者比较
- 前者
- 兼容性好,
hashChange支持到 IE8 url中会携带/#/,不美观- 不需要服务端改造
- 兼容性好,
- 后者
- 兼容到 IE10
url跟正常url一样- 由于其
url跟正常url一样,所以在刷新时,会以此url为链接请求服务端页面,而服务端是没有这个页面的,会 404,因此需要服务端配合将所有请求重定向到首页,将整个路由的控制交给前端路由
VueRouter支持三种路由模式,分别为hash、history、abstracthash模式就是第一种方案的实现history模式是第二种方案的实现abstract模式是用在非浏览器环境的,主要用于SSR
核心类
VueRouter的三种路由模式,主要由下面的三个核心类实现History- 基础类
- 位于
src/history/base.js
HTML5History- 用于支持
pushState的浏览器 src/history/html5.js
- 用于支持
HashHistory- 用于不支持
pushState的浏览器 src/history/hash.js
- 用于不支持
AbstractHistory- 用于非浏览器环境(服务端渲染)
src/history/abstract.js
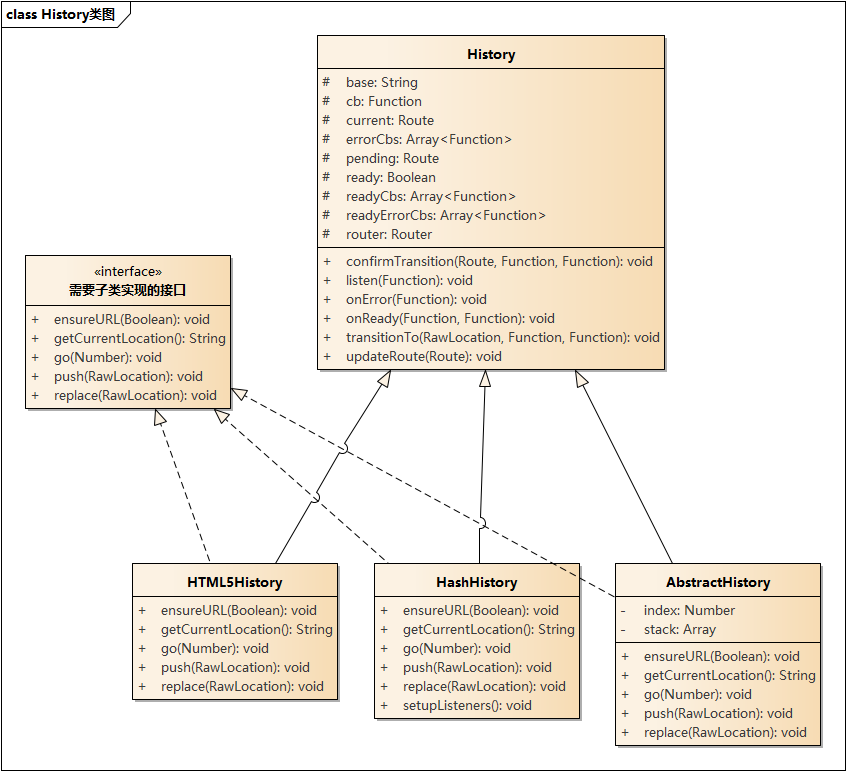
- 通过下面这张图,可以了解到他们之间的关系
- route-mode-class.png
HTML5History、HashHistory、AbstractHistory三者都是继承于基础类History;- 三者不光能访问
History类的所有属性和方法,他们还都实现了基础类中声明的需要子类实现的 5 个接口(go、push、replace、ensureURL、getCurrentLocation) - 由于
HashHistory监听hashChange的特殊性,所以会单独多一个setupListeners方法 AbstractHistory由于需要在非浏览器环境使用,没有历史记录栈,所以只能通过index、stack来模拟- 前面我们分析
VueRouter实例化过程时,知道VueRouter会在确定完路由模式后,会实例化不同的History实例 - 那我们来看看不同
History的实例化过程
History 类
- 它是父类(基类),其它类都是继承它的
- 代码位于
src/history/base.js
1 | // src/history/base.js |
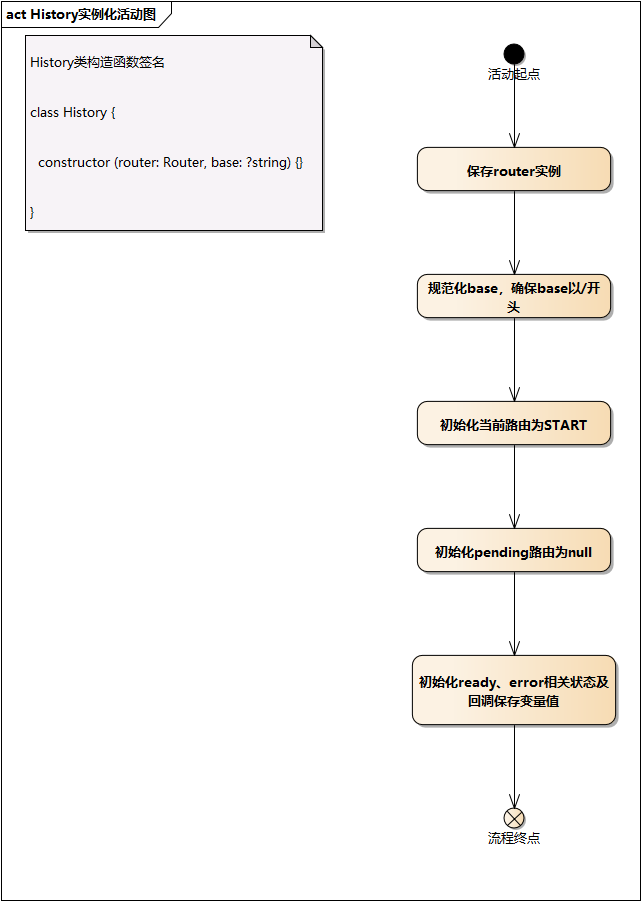
- 可以看到,构造函数中主要干了下面几件事
- 保存了
router实例 - 规范化了
base,确保base是以/开头 - 初始化了当前路由指向,默认只想
START初始路由;在路由跳转时,this.current代表的是from - 初始化了路由跳转时的下个路由,默认为
null;在路由跳转时,this.pending代表的是to - 初始化了一些回调相关的属性
- 保存了
START定义在src/utils/route.js中
1 | // src/utils/route.js |
History类的实例化过程如下- history.png
HTML5History 类
- 我们再看看
HTML5History类,它是继承自History类 - 位于
src/history/html5.js
1 | export class HTML5History extends History { |
- 可以看到其是继承于
History类,所以在构造函数中调用了父类构造函数(super(router,base)) - 检查了是否需要支持滚动行为,如果支持,则初始化滚动相关逻辑
- 监听了
popstate事件,并在popstate触发时,调用transitionTo方法实现跳转 - 注意这里处理了一个异常场景
- 某些浏览器下,打开页面会触发一次
popstate,此时如果路由组件是异步的,就会出现popstate事件触发了,但异步组件还没解析完成,最后导致route没有更新 - 所以对这种情况做了屏蔽
- 某些浏览器下,打开页面会触发一次
- 关于滚动和路由跳转后面有专门章节会讲
HTML5History类的实例化过程如下- h5history.png

HashHistory 类
- 位于
src/history/hash.js
1 | // src/history/hash.js |
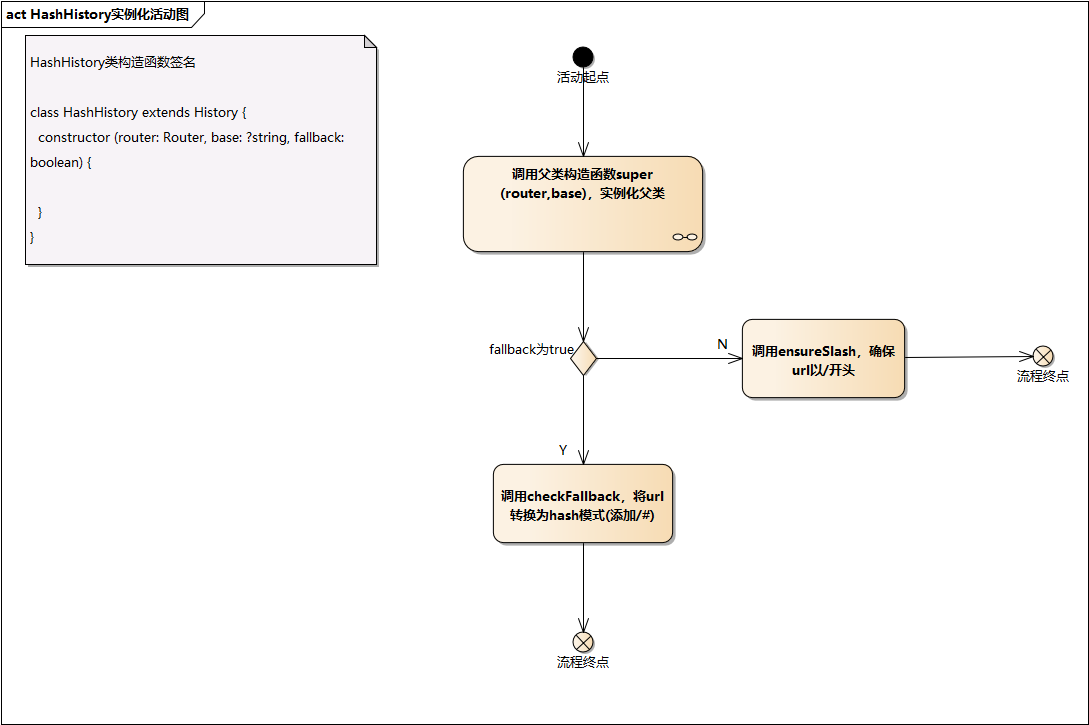
- 它继承于
History,所以也调用了super(router,base) - 检查了
fallback,看是否需要回退,前面说过,传入的fallback只有在用户设置了history且又不支持pushState并且启用了回退时才为true - 所以,此时,需要将
history模式的url替换成hash模式,即添加上#,这个逻辑是由checkFallback实现的 - 如果不是
fallback,则直接调用ensureSlash,确保url是以/开头的 - 我们看下
checkFallback、ensureSlash实现
1 | // src/history/hash.js |
- 是不是发现
HashHistory少了滚动支持和监听hashChange相关逻辑,这是因为hashChange存在一些特殊场景,需要等到mounts后才能监听- 这一块的逻辑全放在了
setupListeners方法中,setupListeners会在VueRouter调用init时被调用,这个我们在初始化章节再看
- 这一块的逻辑全放在了
HashHistory类的实例化过程如下- hash-history.png
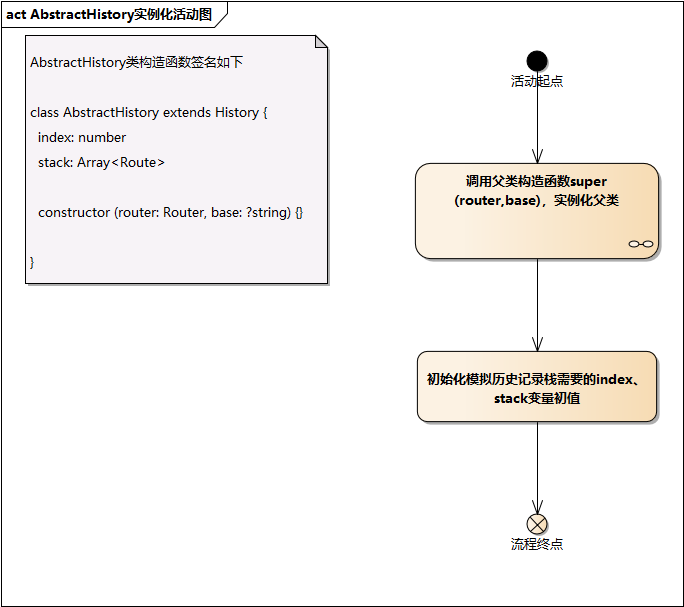
AbstractHistory 类
AbstractHistory是用于非浏览器环境的- 位于
src/history/abstract.js
1 | // src/history/abstract.js |
- 可以看到它的实例化是最简单的,只初始化了父类,并对
index、stack做了初始化 - 前面说过,非浏览器环境,是没有历史记录栈的,所以使用
index、stack来模拟历史记录栈 AbstractHistory类的实例化过程如下- abstract-history.png
小结
- 这一小节我们对三种路由模式做了简单分析,并且还一起看了实现这三种路由模式所需要的
History类是如何实例化的 - 到此,
VueRouter的整个实例化过程基本讲完 - 下面,我们通过一个图来简单总结下
VueRouter实例化过程 - vue-router-instance.png
初始化流程
- 分析完实例化过程,下面我们来看看初始化是如何进行的,都做了哪些事情
调用 init 时机
- 在分析安装流程时,我们知道
VueRouter注册了一个全局混入,混入了beforeCreate钩子 - 代码如下
1 | // src/install.js |
- 我们知道全局混入,会影响后续创建的所有
Vue实例,所以beforeCreate首次触发是在Vue根实例实例化的时候即new Vue({router})时,
触发后调用router实例的init方法并传入Vue根实例,完成初始化流程; - 由于
router仅存在于Vue根实例的$options上,所以,整个初始化只会被调用一次 - 我们接下来看下
init方法实现
init 方法
VueRouter的init方法位于src/index.js
1 | // src/install.js |
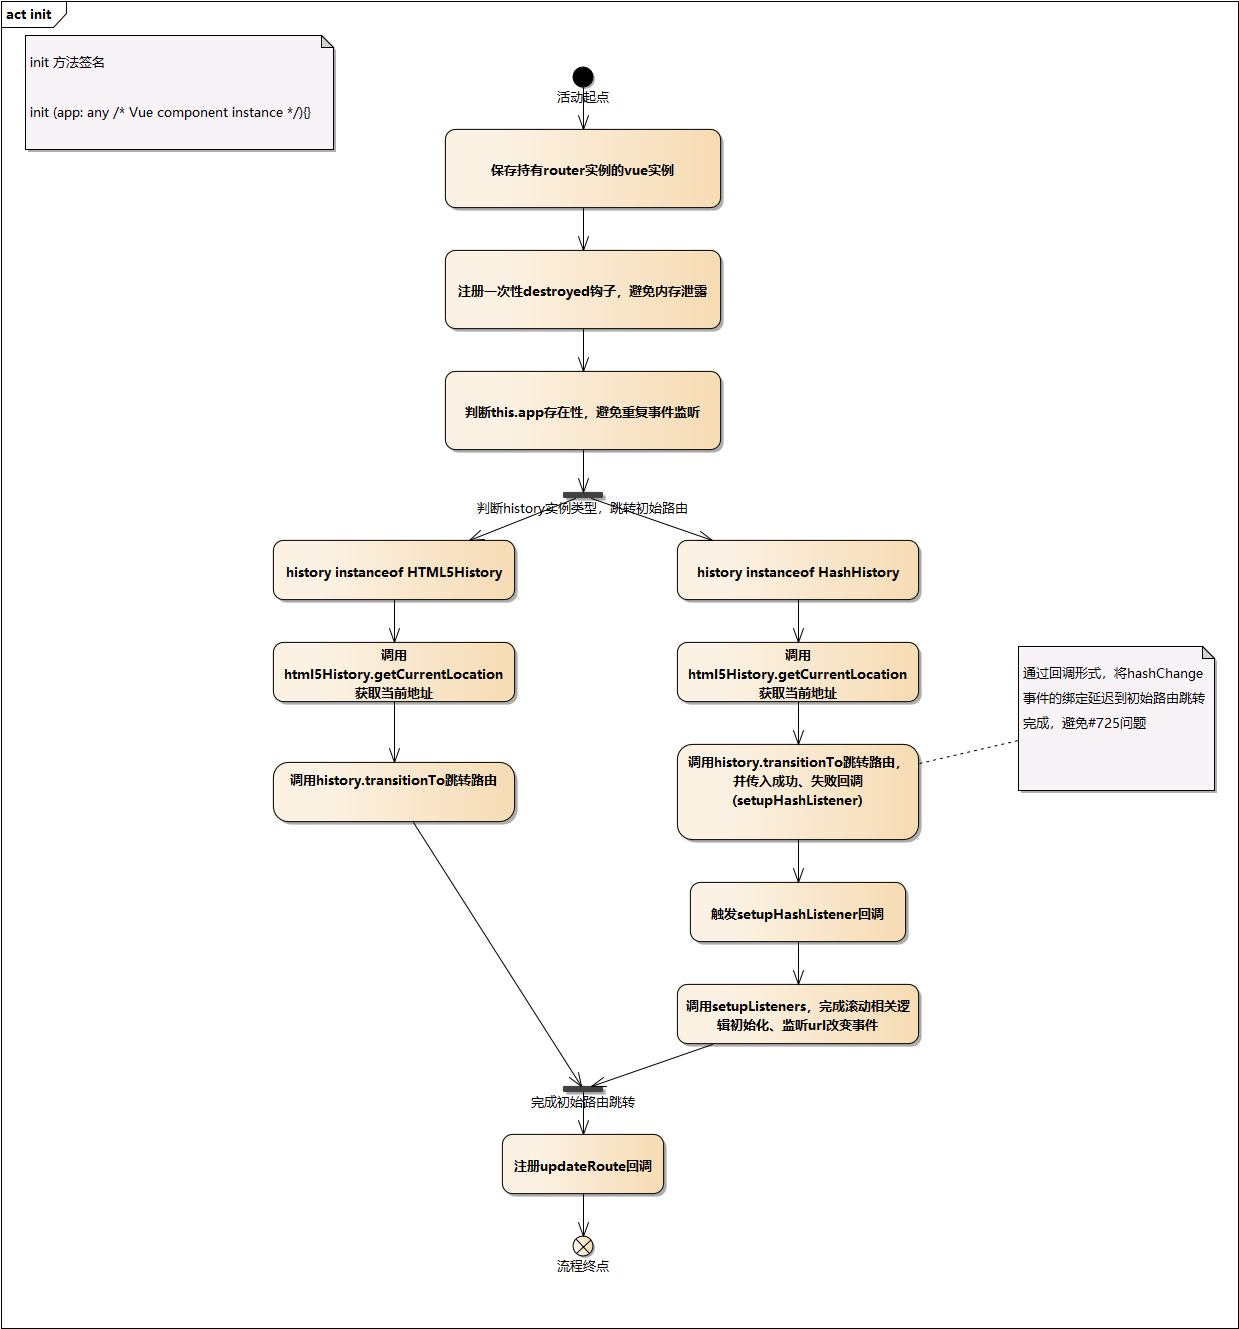
- 可以看到,主要做了下面几件事
- 检查了
VueRouter是否已经安装 - 保存了挂载
router实例的vue实例VueRouter支持多实例嵌套,所以存在this.apps来保存持有router实例的vue实例
- 注册了一个一次性钩子
destroyed,在destroyed时,卸载this.app,避免内存泄露 - 检查了
this.app,避免重复事件监听 - 根据
history类型,调用transitionTo跳转到不同的初始页面 - 注册
updateRoute回调,在router更新时,更新app._route完成页面重新渲染- 这个我们在
view组件章节会详细讲
- 这个我们在
- 我们重点看下
transitionTo相关逻辑
setupListeners
- 上面说到,在初始化时,会根据
history类型,调用transitionTo跳转到不同的初始页面 - 为什么要跳转初始页面?
- 因为在初始化时,url 可能指向其它页面,此时需要调用
getCurrentLocation方法,从当前 url 上解析出路由,然后跳转之
- 因为在初始化时,url 可能指向其它页面,此时需要调用
- 可以看到
HTML5History类和HashHistory类调用transitionTo方法的参数不太一样- 前者只传入了一个参数
- 后者传入了三个参数
- 我们看下
transitionTo方法的方法签名
1 |
|
- 首个参数是需要解析的地址,第二是跳转成功回调,第三个是跳转失败回调
- 我们来看下
HashHistory类为何需要传入回调 - 可以看到传入的成功、失败回调都是
setupHashListener函数,setupHashListener函数内部调用了history.setupListeners方法,而这个方法是HashHistory类独有的 - 打开
src/history/hash.js
1 | // src/history/hash.js |
- 主要逻辑如下
setupListeners主要判断了是否需要支持滚动行为,如果支持,则初始化相关逻辑- 然后添加
url变化事件监听,之前说过实现路由有两种方案pushState+popState、hash+hashChange - 可以看到这里即使是
HashHistory也会优先使用popstate事件来监听url的变化 - 当
url发生变化时,会调用transitionTo跳转新路由 - 可以看到这一块的逻辑和
HTML5History类在实例化时处理的逻辑很类似
1 | // src/history/html5.js |
- 那为何二者处理的时机不同呢?
HTML5Histroy在实例化时监听事件HashHistory在初次路由跳转结束后监听事件
- 这是为了修复#725 问题
- 如果
beforeEnter是异步的话,beforeEnter就会触发两次,这是因为在初始化时,hash值不是/开头的话就会补上#/,这个过程会触发hashchange事件,所以会再走一次生命周期钩子,导致再次调用beforeEnter钩子函数。所以只能将hashChange事件的监听延迟到初始路由跳转完成后;
- 如果
小结
- 针对 init 流程,总结了下面的活动图
- init.png
总结
- 文章主要从前端路由的整体设计思路开始,逐步分析前端路由设计的基本原则,理清设计思路
- 然后介绍了贯穿全局的
vue-router几个术语 - 对术语有个大概印象后,我们又介绍了
vue-router的目录结构,其是如何进行分层的 - 了解目录结构后,我们从安装开始剖析,了解
vue-router在安装时都做了哪些事 - 安装结束,我们又介绍了几个
History类之间是怎样的继承关系,其又是如何实例化的 - 实例化结束,我们最后介绍了初始化的过程
PS
- 后面还会介绍其余部分,如果觉得还行,可以给个赞哦 ✨
- 个人
github,也总结了一些东西,欢迎 star - 基于 canvas 的绘图板drawing-board
- 前端入门 demo、最佳实践集合 fe-awesome-demos
- 一个自动生成别名的
vue-cli-pluginhttps://www.npmjs.com/package/vue-cli-plugin-auto-alias
参考
- https://github.com/dwqs/blog/issues/53
- https://github.com/dwqs/blog/issues/54
- https://github.com/dwqs/blog/issues/55
- https://github.com/vuejs/vue-router/issues/2184#issuecomment-393484643
- https://juejin.im/post/5e456513f265da573c0c6d4b
- https://juejin.im/post/584040e1ac502e006cbedb23
- https://juejin.im/post/5df0ada0f265da33d56d1a2f
- https://juejin.im/post/5dbed0bef265da4cff701f68
- https://www.jianshu.com/p/29e8214d0bee
- https://ustbhuangyi.github.io/vue-analysis/v2/vue-router/
- https://blog.liuyunzhuge.com/2020/04/08/vue-router 源码:create-matcher/