vue-router 源码解析 | 1.5w 字 | 多图预警 - 【中】
- 各位好,我是光辉 😎
- 本篇是
vue-router源码解析的中篇,也是核心篇 - 本篇主要介绍了下面几点
- 介绍了
vue-router是如何做路由匹配的 - 以及其相关的守卫、钩子是如何触发的
- 异步组件又是如何处理的等等
- 介绍了
- 虽然看着知识点很少,但内容却一点都不少
- 另外还是要说一下
- 第一次做源码解析,肯定有很多错误或理解不到位的地方,欢迎指正 🤞
- 项目地址
https://github.com/BryanAdamss/vue-router-for-analysis- 如果觉得对你有帮助,记得给我一个
star✨
- uml 图源文件
https://github.com/BryanAdamss/vue-router-for-analysis/blob/dev/vue-router.EAP
- 关联文章链接
路由跳转
- 前面介绍过,要实现路由的跳转,首先得从路由映射表中找到与地址匹配的路由对象,这个过程称之为路由匹配,找到匹配的路由后,然后再解析跳转
- 所以实现路由跳转有两个关键步骤:路由匹配、导航解析
VueRouter将上述两个关键步骤封装到transitionTo方法中了- 接下来,我们先看看
transitionTo的实现
transitionTo
- 前面介绍过,
transitionTo方法定义在基类History上的
1 | // src/history/base.js |
- 在
setupListeners章节也介绍过transitionTo的方法签名 - 接收三个参数
location为RawLocation类型,代表需要解析的地址onComplete是跳转成功回调,在路由跳转成功时调用onAbort是跳转失败(取消)回调,在路由被取消时调用
- 看下内部逻辑
- 调用
router实例的match方法,从路由映射表中取到将要跳转到的路由对象route;这其实就是路由匹配过程; - 拿到将要跳转的
route后,调用confirmTransition完成route的解析跳转,并在跳转成功、取消时调用对应回调方法;这是导航解析过程- 成功时,调用
updateRoute触发重新渲染,然后触发相关回调;关于渲染,我们后面章节会讲 - 取消(失败)时,触发相关回调
- 成功时,调用
- 那我们下面先看下路由匹配过程
路由匹配
transitionTo中会调用router实例的match方法实现路由匹配
1 | // src/index.js |
router实例的match方法,又调用的匹配器的match方法,将参数直接透传过去- 关于匹配的创建可以看之前的
创建匹配器章节
- 关于匹配的创建可以看之前的
- 我们继续看匹配器的
match方法
1 | // src/create-matcher.js |
- 由于
router.match是将参数透传过来的,所以二者的签名一模一样raw是RawLocation类型,是需要进行路由匹配的地址currentRoute是当前路由对象redirectedFrom代表从哪个地址重定向过来的
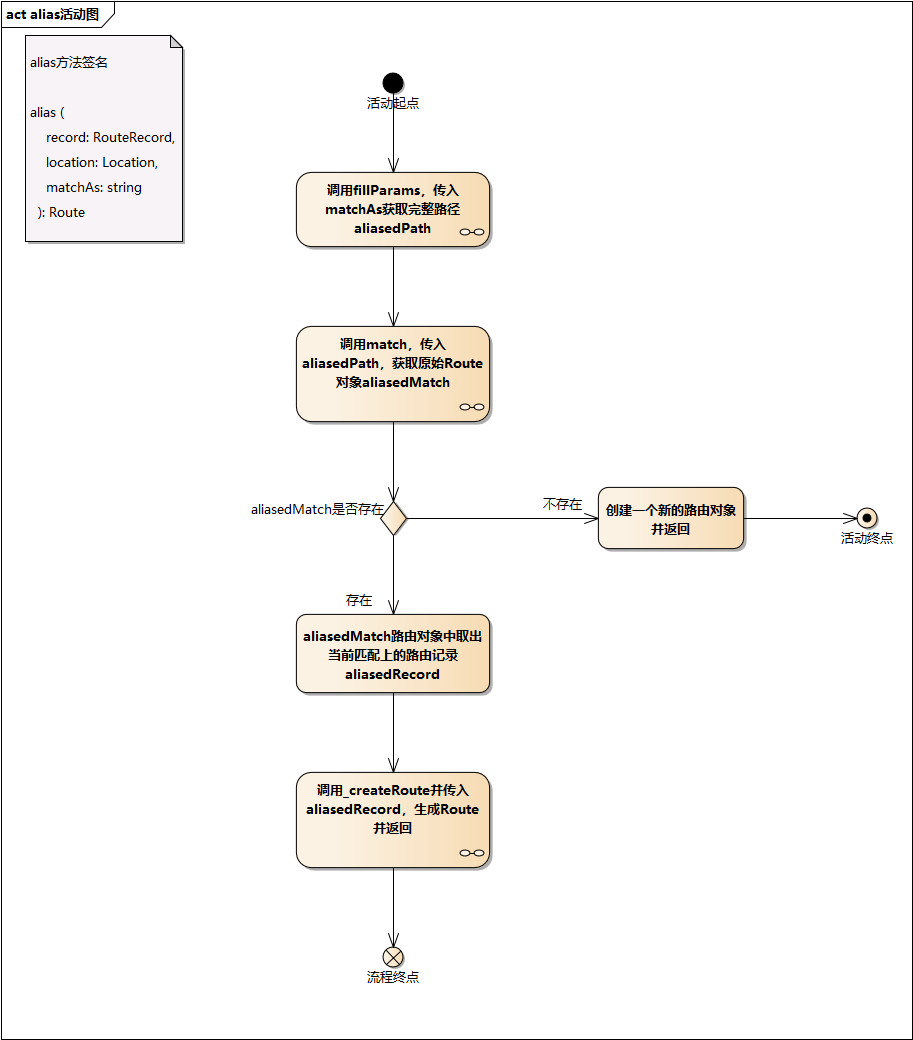
- 我们看下
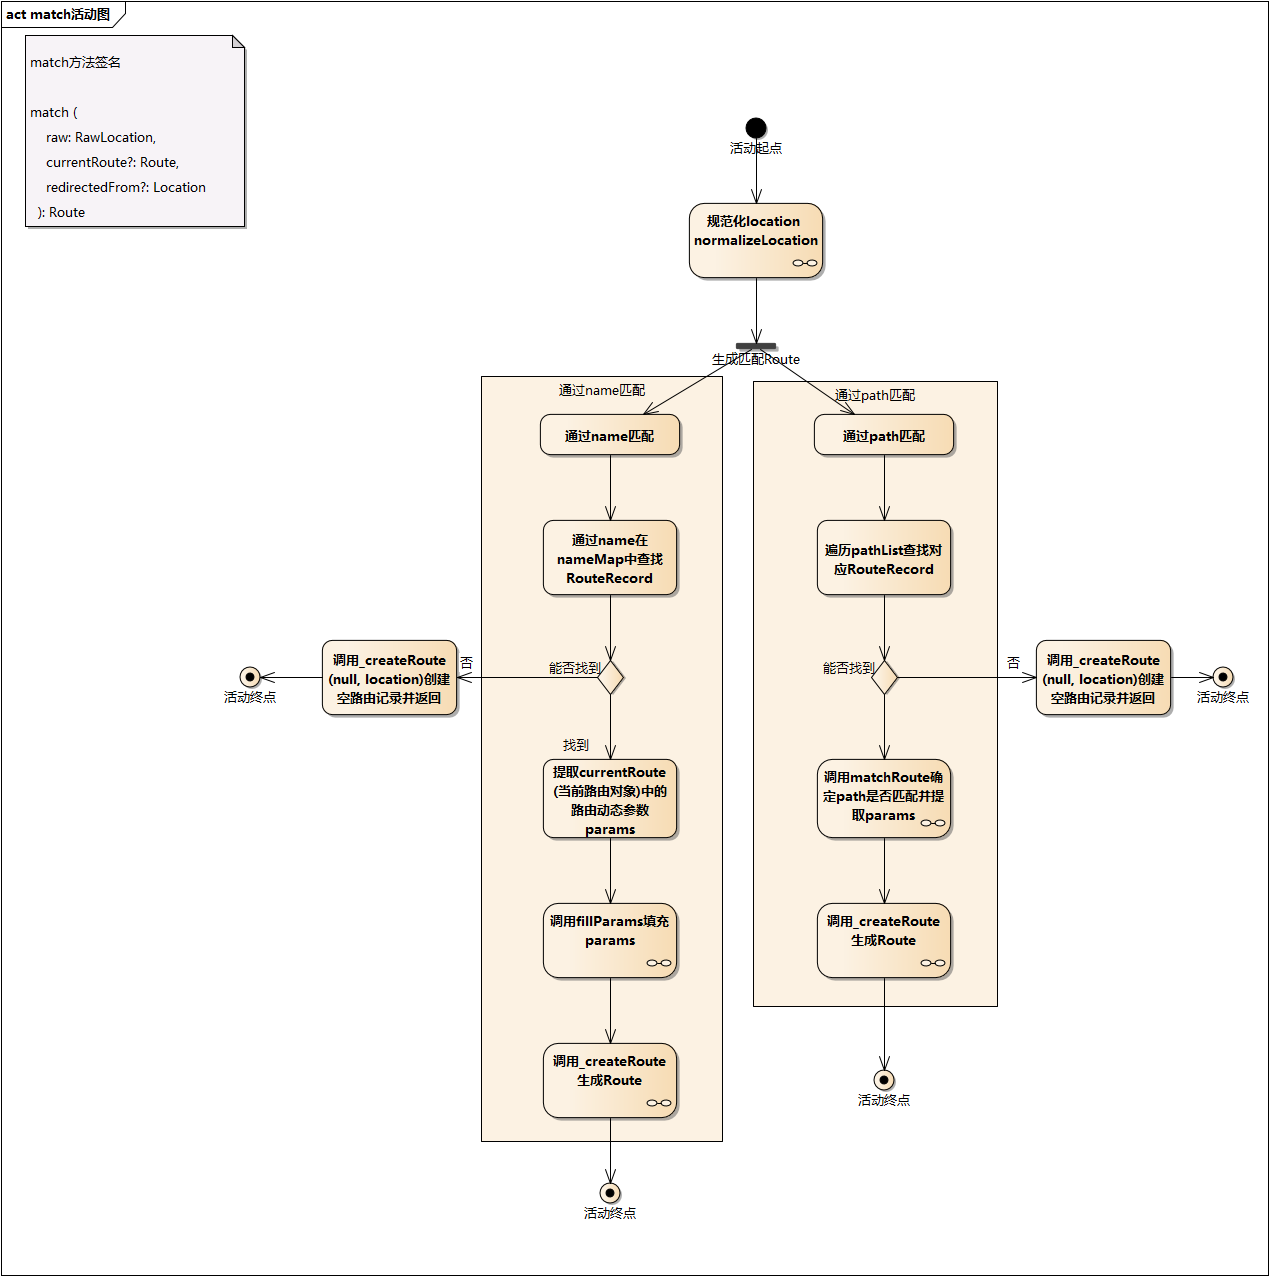
match方法逻辑- 首先它对传入的
raw地址,进行了格式化(规范化) - 然后取出格式化地址中的
name name存在,判断是否能通过name在nameMap中找到对应的路由记录RouteRecord- 无法找到,则创建一个新
route对象返回 - 可以找到,则填充
params,并使用此路由记录创建一个新的Route对象返回
- 无法找到,则创建一个新
name不存在,则判断path是否存在- 存在,则利用
pathList、pathMap调用matchRoute判断是否匹配,进而找到匹配的路由记录,然后使用此路由记录创建新route对象返回
- 存在,则利用
name、path都不存在- 则直接创建一个新
route对象返回
- 则直接创建一个新
- 首先它对传入的
- 活动图如下
- match.png
- 我们提取一下上述流程的关键词
地址格式化normalizeLocation、地址是否匹配判断matchRoute、填充参数fillParams、创建路由对象_createRoute
地址格式化 normalizeLocation
- 我们看下为何需要对地址做格式化
- 我们知道
VueRoute定义的地址是RawLocation类型的,而它是联合类型的,支持string和Location类型
1 | // flow/declarations.js |
- 所以下面的地址都是合法的
$router.push方法的参数也是的RawLocation类型,所以使用$router.push来举例
1 | // 字符串形式 |
- 可以看到
VueRouter需要兼容上面所有情况,为了方便处理,需要对地址做格式化 - 看下实现逻辑
1 | // src/util/location.js |
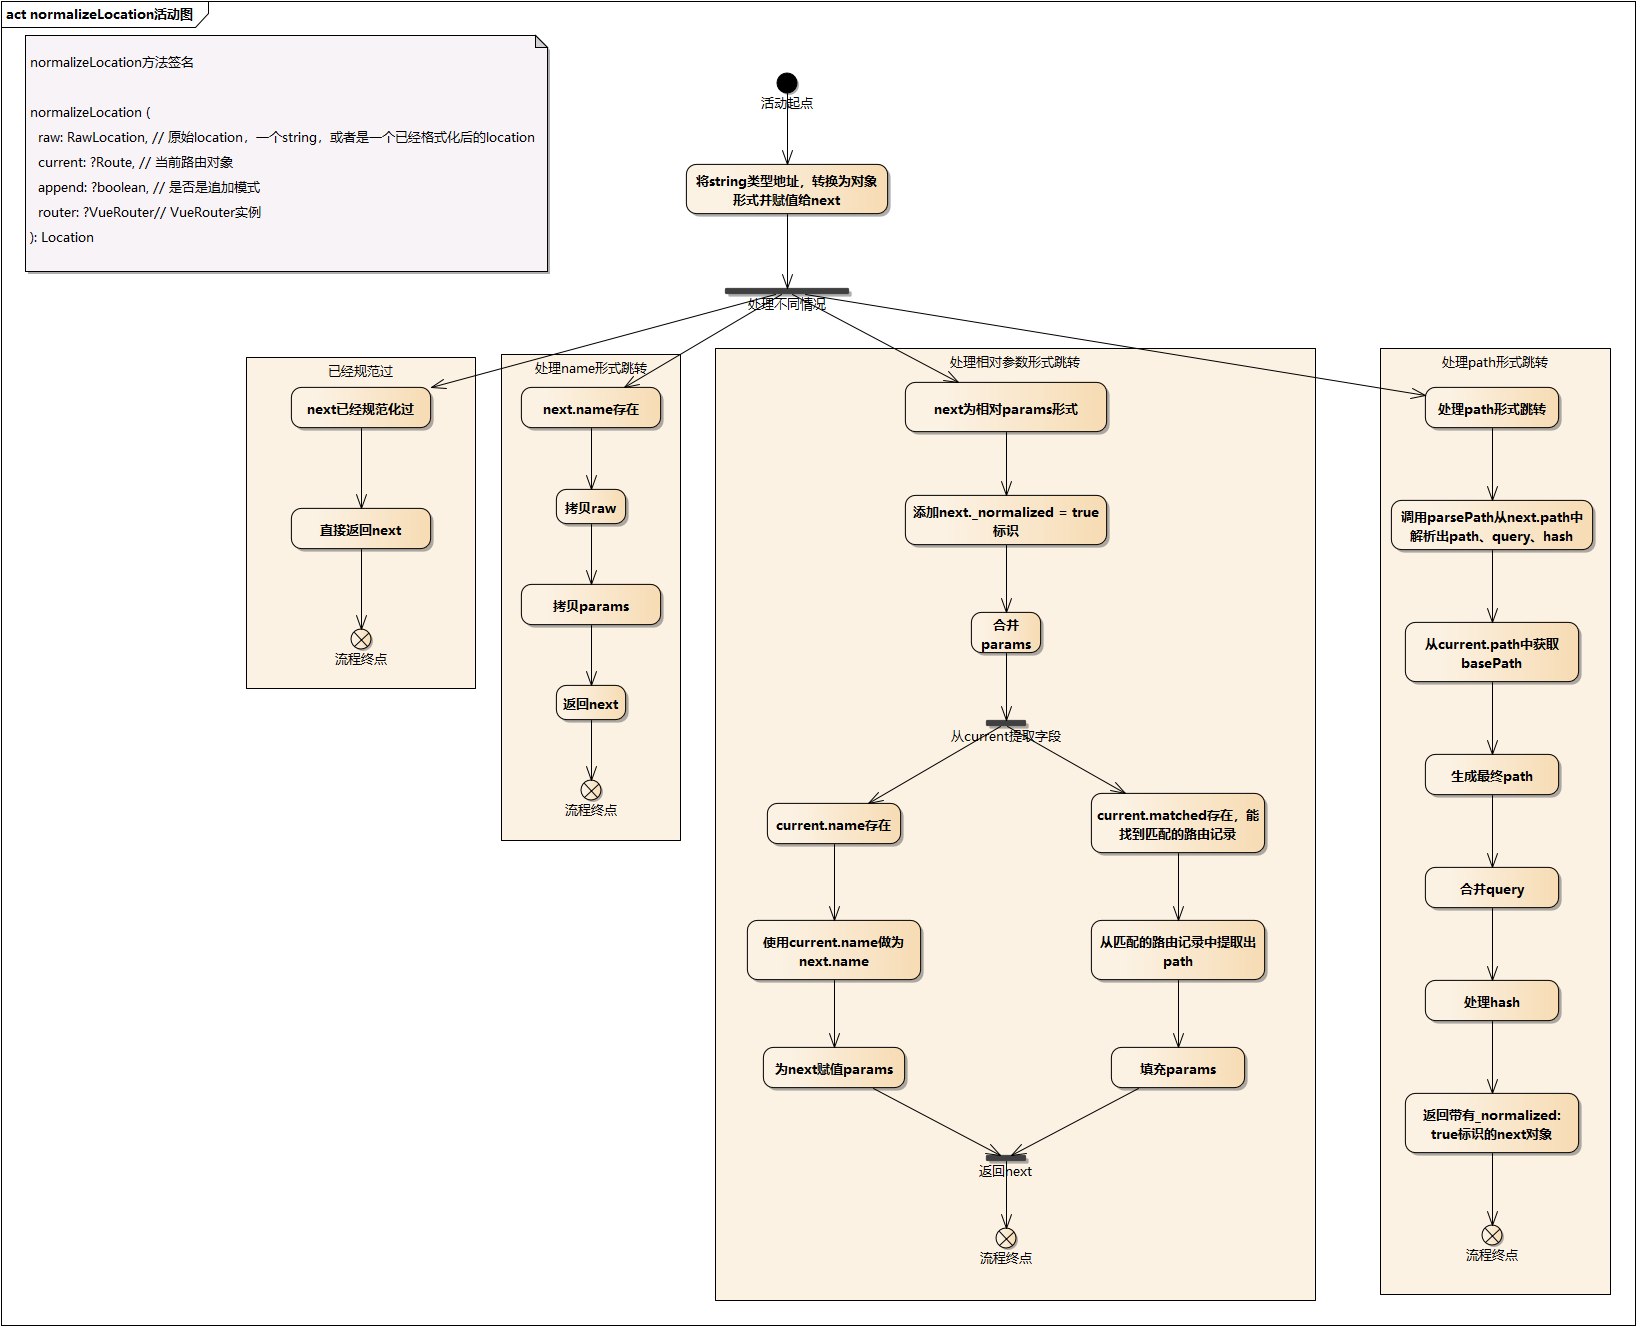
- 首先将
string类型的转换为对象形式,方便后面统一处理 - 如果发现地址已经做过格式化处理,则直接返回
- 再判断是否是命名路由
- 若是,则拷贝原始地址
raw,拷贝params,直接返回
- 若是,则拷贝原始地址
- 处理了仅携带参数的相对路由(相对参数)跳转,就是
this.$router.push({params:{id:1}})形式- 对这种地址的定义是
没有path、仅有params并且当前路由对象存在 - 主要处理逻辑是
- 先合并
params - 若是命名路由,则使用
current.name做为next.name,并赋值params - 非命名路由,从当前路由对象中找到匹配的路由记录,并取出路由记录上的
path做为next.path,然后填充params - 返回处理好的地址
- 先合并
- 由于这中跳转方式,仅有
params,所以必须从当前路由对象current上获取可用字段(path、name),做为自身值,然后跳转
- 对这种地址的定义是
- 处理通过
path跳转的方式- 调用
parsePath从path中解析出path、query、hash - 然后以
current.path为basePath,解析(resolve)出最终path - 对
query进行合并操作 - 对
hash进行前追加#操作 - 返回带有
_normalized:true标识的Location对象
- 调用
- 经过上面一番处理,无论传入何种地址,都返回一个带有
_normalized:true标识的Location类型的对象 - normalize-location.png
地址是否匹配判断 matchRoute
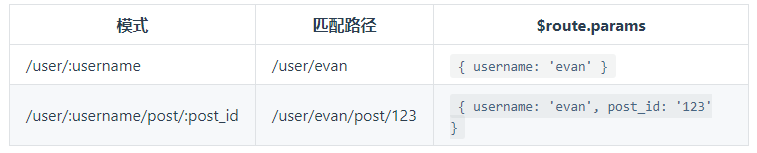
- 我们知道
VueRouter是支持动态路由匹配的,如下图所示 - dynamic-route.png
- 我们在上篇的
生成路由记录章节也介绍过,VueRouter在生成路由记录时,会通过path-to-regexp包生成一个正则扩展对象并赋值到路由记录的regex字段上,用于后续的动态路由参数的获取- 主要的逻辑是提供一个动态路由
user/:id和一个地址/user/345,通过path-to-regexp就能生成一个对象{id:345}来表达参数的映射关系 - 是一个借助动态路由,从 url 上提取参数的过程;
/user/345->{id:345} - 具体例子可查看
生成路由记录章节
- 主要的逻辑是提供一个动态路由
- 上述提取参数的逻辑是在
matchRoute实现的 matchRoute位于src/create-matcher.js
1 | // src/create-matcher.js |
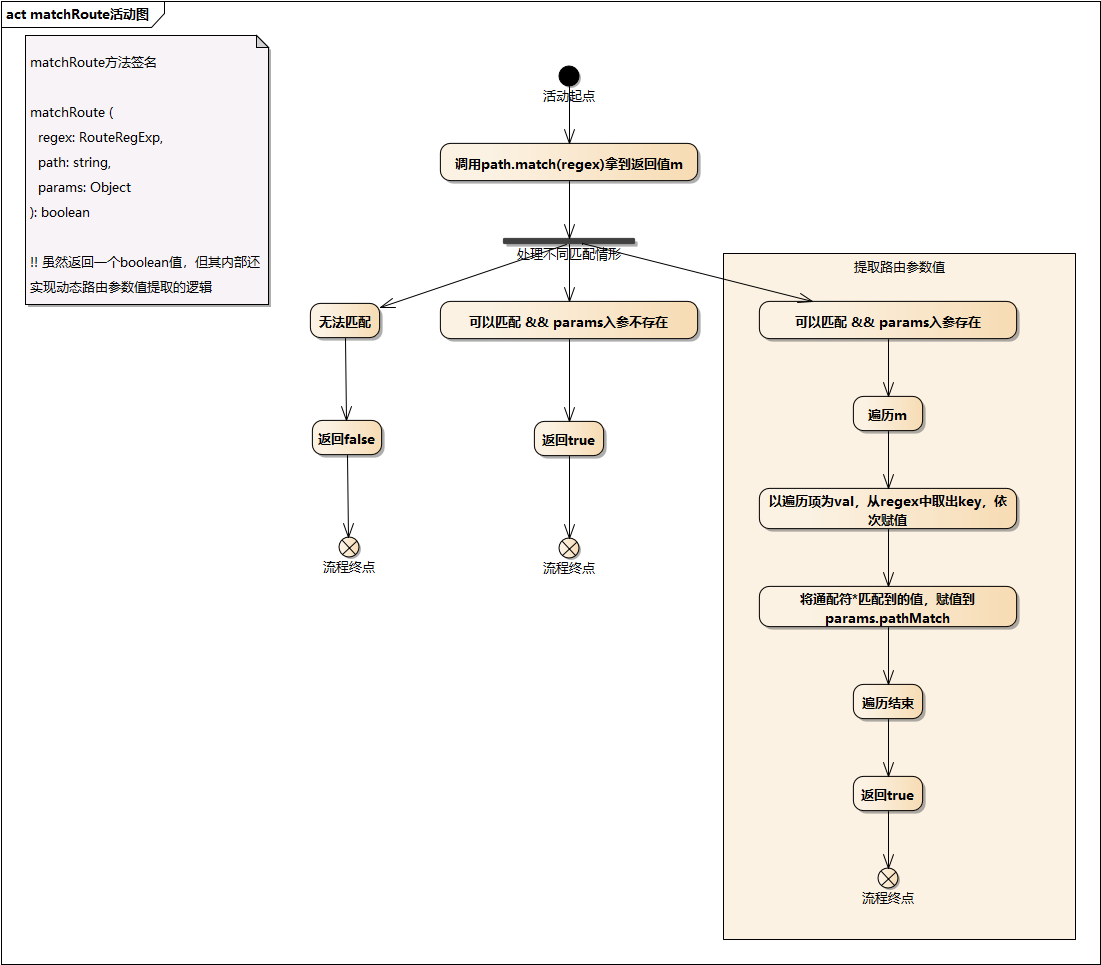
- 通过方法签名,可以知道它返回一个
boolean值,这个值代表传入的path是否能通过regex的匹配;虽然返回一个boolean值,但是其内部还做了件很重要的事,从path上提取动态路由参数值,我们看下完整逻辑 - 首先调用
path.match(regex) - 不能匹配直接返回
false - 可以匹配且无
params,返回true - 剩下的就只有一种情况,可以匹配且
params存在,此时需要对params进行正确赋值- 整个赋值,主要是遍历
path.match(regex)返回值并取出regex中存储的key,然后依次赋值,关于细节可以参考上面的注释; - 关于
regex、path-to-regexp,可以参考生成路由记录章节和https://www.npmjs.com/package/path-to-regexp
- 整个赋值,主要是遍历
- 还有一个点,赋值时的
pathMatch是什么?- 这其实是跟通配符即
*有关的 VueRouter关于通配符的特殊处理可以看https://router.vuejs.org/zh/guide/essentials/dynamic-matching.html#捕获所有路由或-404-not-found-路由- 即
pathMatch会代表通配符匹配到的路径
- 即
- 这其实是跟通配符即
- 官方例子如下
1 | { |
- match-route.png
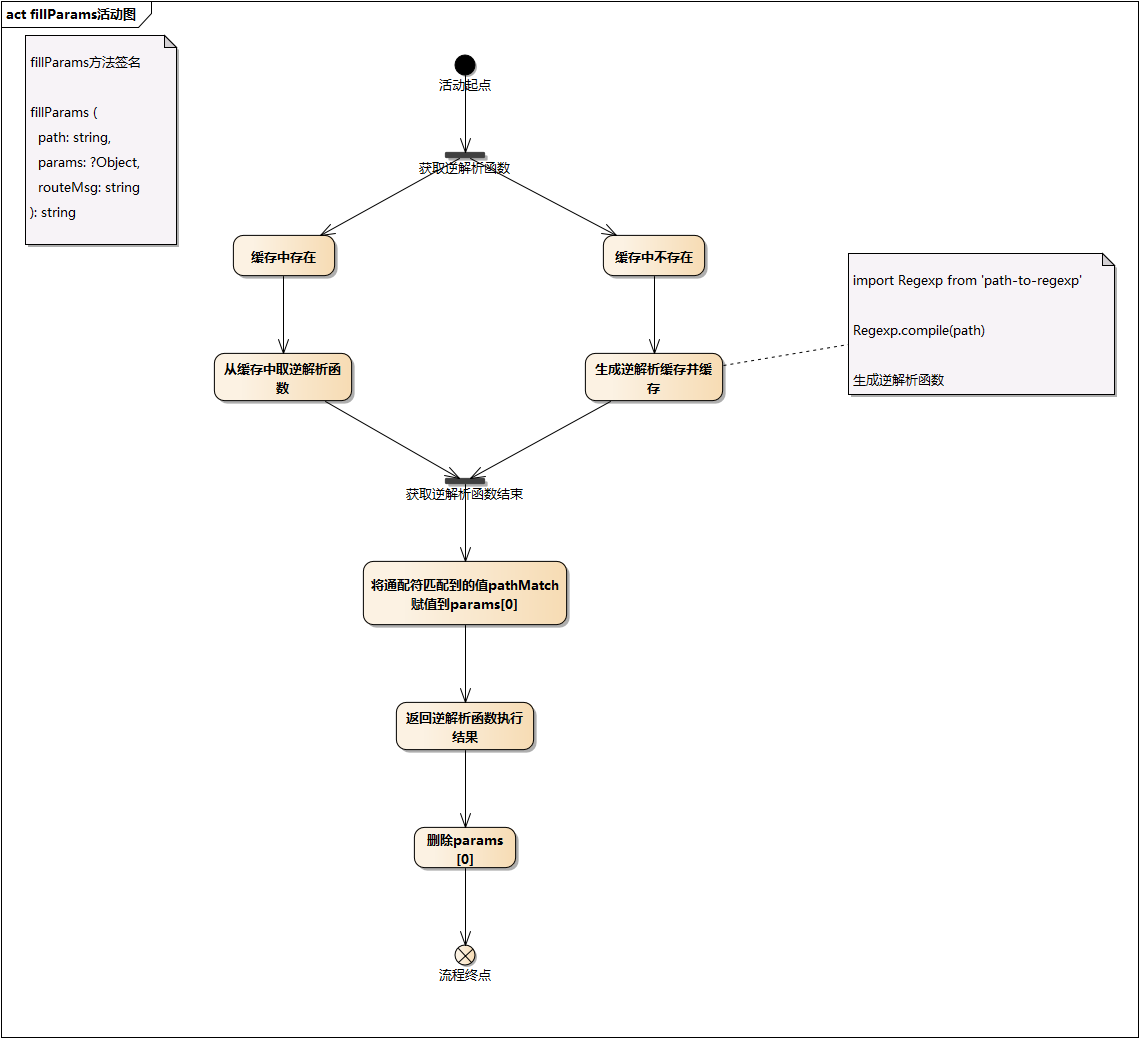
填充参数 fillParams
fillParams可以看做是matchRoute的逆操作,是一个借助动态路径,使用参数生成 url 的过程;即/user/:id+{id:345}->/user/345- 可以看下它的实现
1 | // src/util/params.js |
- 可以看到整个逆解析逻辑是借助
Regexp.compile结合regexpCompileCache实现的 Regexp.compile接收一个动态路由path,返回一个函数,可用这个函数做逆解析;Regexp.compile例子如下
1 | // https://www.npmjs.com/package/path-to-regexp#compile-reverse-path-to-regexp |
- 可以看到首先对
Regexp.compile返回的函数做了缓存 - 然后将
matchRoute中添加的pathMatch赋值给params[0] - 调用
Regexp.compile返回函数,以params为入参,逆解析url并返回 - 删除添加的
params[0] - fill-params.png
创建路由对象_createRoute
- 上面无论是
normalizeLocation、matchRoute、fillParams都是针对传入的地址做一些操作; - 而
match方法的作用是找到与地址匹配的路由对象,而这个主要是由_createRoute方法实现 - 从命名上可以看出,这是个内部方法
1 | //src/create-matcher.js createMatcher方法内 |
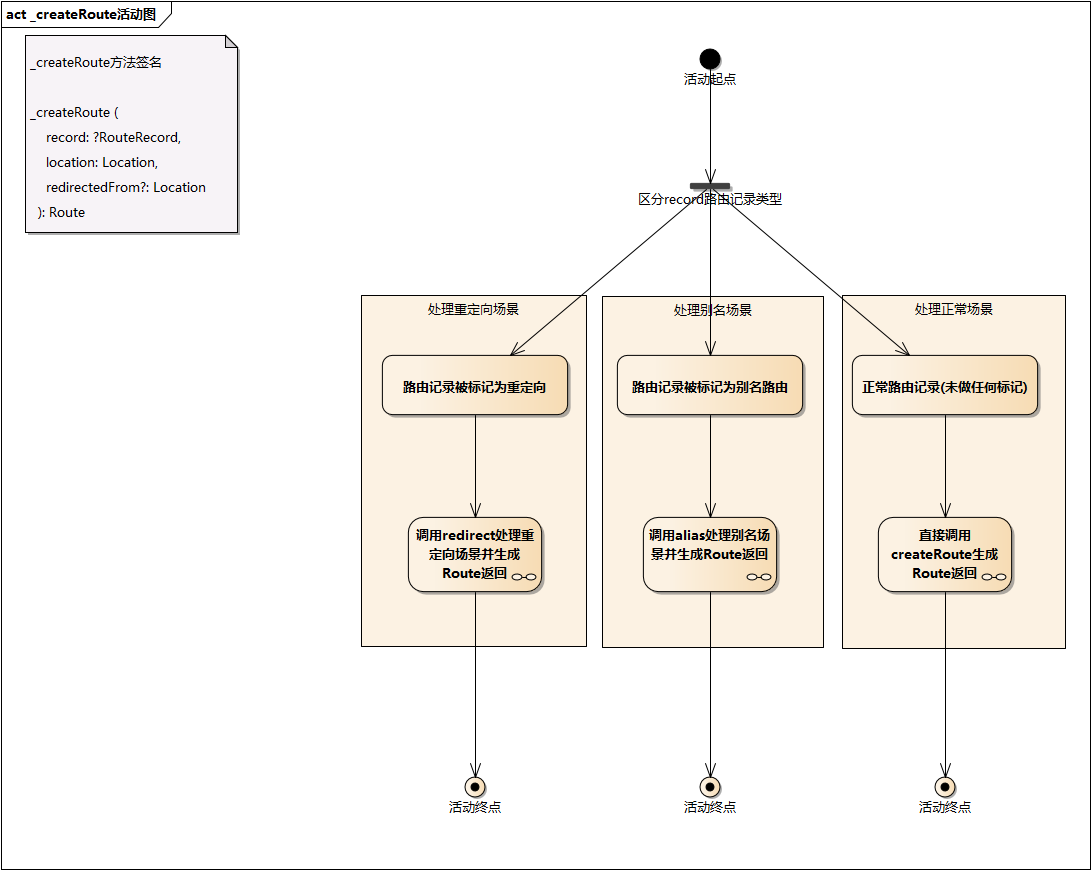
- 可以看到它接收三个参数
record用来生成Route对象的目标路由记录location目标地址redirectedFrom重定向的来源地址,这个参数只在发生重定向时才会有值
- 我们知道,在新增路由记录时,会对不同类型的记录添加上不同的标记字段
- 如为重定向路有记录添加
redirect字段 - 为别名路由添加
matchAs字段- 具体可看前面的
生成路由记录章节
- 具体可看前面的
- 如为重定向路有记录添加
- 可以看到针对不同的路由记录类型调用了不同方法
- 重定向路由调用
redirect方法 - 别名路由调用
alias方法 - 其余的调用
createRoute方法
- 重定向路由调用
- 活动图如下
- create-route-inner.png
- 其实
redirect、alias方法内部也调用了createRoute方法 - 所以我们先看
createRoute方法实现
createRoute
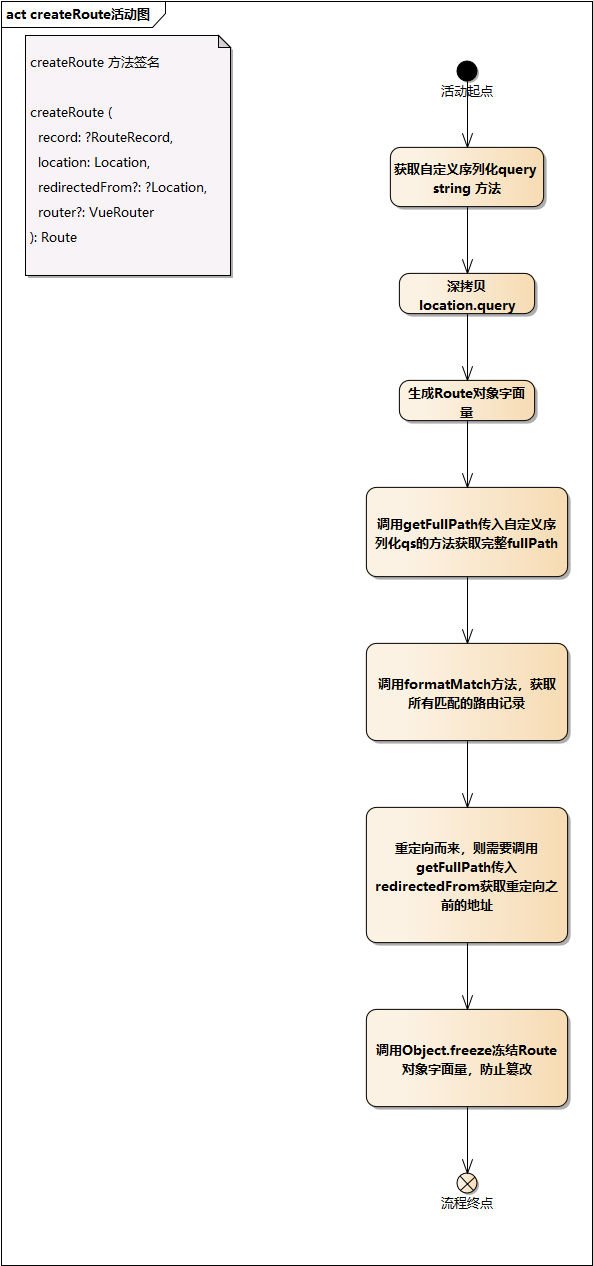
createRoute位于src/util/route.js
1 | // src/util/route.js |
- 由于
VueRouter支持传入自定义序列化queryString方法,所以第一步先获取序列化queryString的方法 - 然后对
query做了一个深拷贝,避免相互影响 - 接下来就是生成新
Route对象 - 如果是从其他路由重定向过来的,则生成完整的重定向来源地址,并赋值给新生成的
Route对象 - 最后调用
Object.freeze冻结新Route对象,因为Route对象是immutable的 - 整个流程如下
- create-route.png
- 可以看到生成
Route时,会调用getFullPath生成完整fullPath
1 | // src/util/route.js |
- 可以看到
getFullPath是在path后面追加了qs和hash - 另外生成
Route时,还会调用formatMatch来获取所有关联的路由记录 - 主要通过向上查找的形式找到所有关联的路由记录
1 | // src/util/route.js |
- 难道一条
Route不是对应(关联)一个路由对象吗? - 其实在术语表介绍
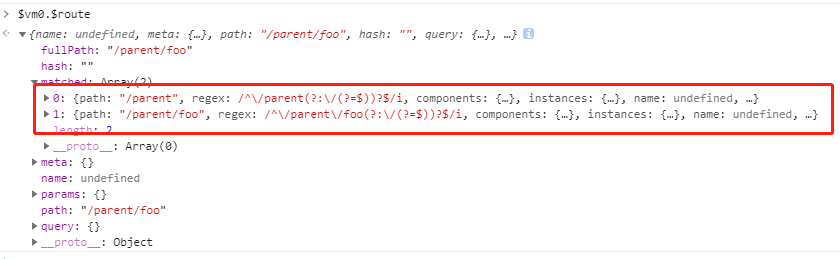
Route路由对象时,也有所提及,一个Route路由对象可能会关联多个RouteRecord路由记录对象 - 这是因为存在嵌套路由的情况,当子路由记录被匹配到时,其实代表着父路由记录也一定被匹配到了,看下面例子
1 | // 当有下面的路由规则 |
- 访问
/parent/foo时,匹配到的路由记录有两个 - match-demo-record.png
- 而且精准匹配到路由记录一定是最后一个,所以后面会看到用
route.matched[route.matched.length - 1]来获取当前route对应的精准匹配的RouteRecord - 看完
createRoute的实现,我们再来看看alias的实现
创建别名路由对象 alias
alias位于src/create-matcher.js
1 | // src/create-matcher.js |
- 逻辑如下
- 先拿
matchAs得到aliasedPath, - 然后拿
aliasedPath走一遍match得到aliasedMatch路由对象 aliasedMatch如果存在,拿aliasedMatch精准匹配的路由记录对象和location,生成路由对象返回- 不存在,则创建一个新的
路由对象返回 - 可能有点绕,我们举个例子
- 前面我们知道,
/a设置了别名/b时,会生成两条路由记录,且/b的路由记录上的matchAs为/a- 忘记的可以看前面的
生成别名路由记录章节
- 忘记的可以看前面的
- 此处传入的
alias的matchAs就相当于/a,先拿matchAs即/a得到填充过params的路径 - 再以此路径调用
match找到匹配的路由对象,记为routeA - 前面也提过,路由对象会关联路由记录,所以从
routeA中可以得到精准匹配的路由记录routeRecordA - 拿此路由记录和
/b的location去生成路由对象并返回 - 这样就实现了官网上说的
/a 的别名是 /b,意味着,当用户访问 /b 时,URL 会保持为 /b,但是路由匹配则为 /a,就像用户访问 /a 一样。效果
- 前面我们知道,
- 活动图如下
- alias.png
- 我们再来看看
redirect的实现
创建重定向路由对象 redirect
- 我们先看下
record.redirect可能的几种情况;https://router.vuejs.org/zh/guide/essentials/redirect-and-alias.html#重定向- 字符串
{redirect:'/'} - 对象
{redirect:{path:'/test'}}、{redirect:{name:'Test'}} - 也支持传入函数
{redirect:to=>{ return {name:'Test'}}}
- 字符串
- 我们先看这个
redirect方法的入口
1 | // src/create-matcher.js _createRoute方法内部 |
- 由于存在多次重定向的场景,所以需要保留首次触发重定向的地址即
redirectedFrom/a->/b->/c,在/c中需要保留首次触发重定向的地址即/a
- 多次重定向,如何保留首次触发重定向的地址呢?
- 在第一次重定向时,
redirectedFrom没有值 - 在
redirect方法内部会将location做为redirectedFrom参数调用match方法,match如果发现仍然需要重定向,则会继续调用redirect,此时redirectedFrom是有值的,就是首次传入的location,依次循环,这样就完成了初始地址的传递
- 在第一次重定向时,
- 可以看下下面的例子
1 | ;[ |
- 当我们访问
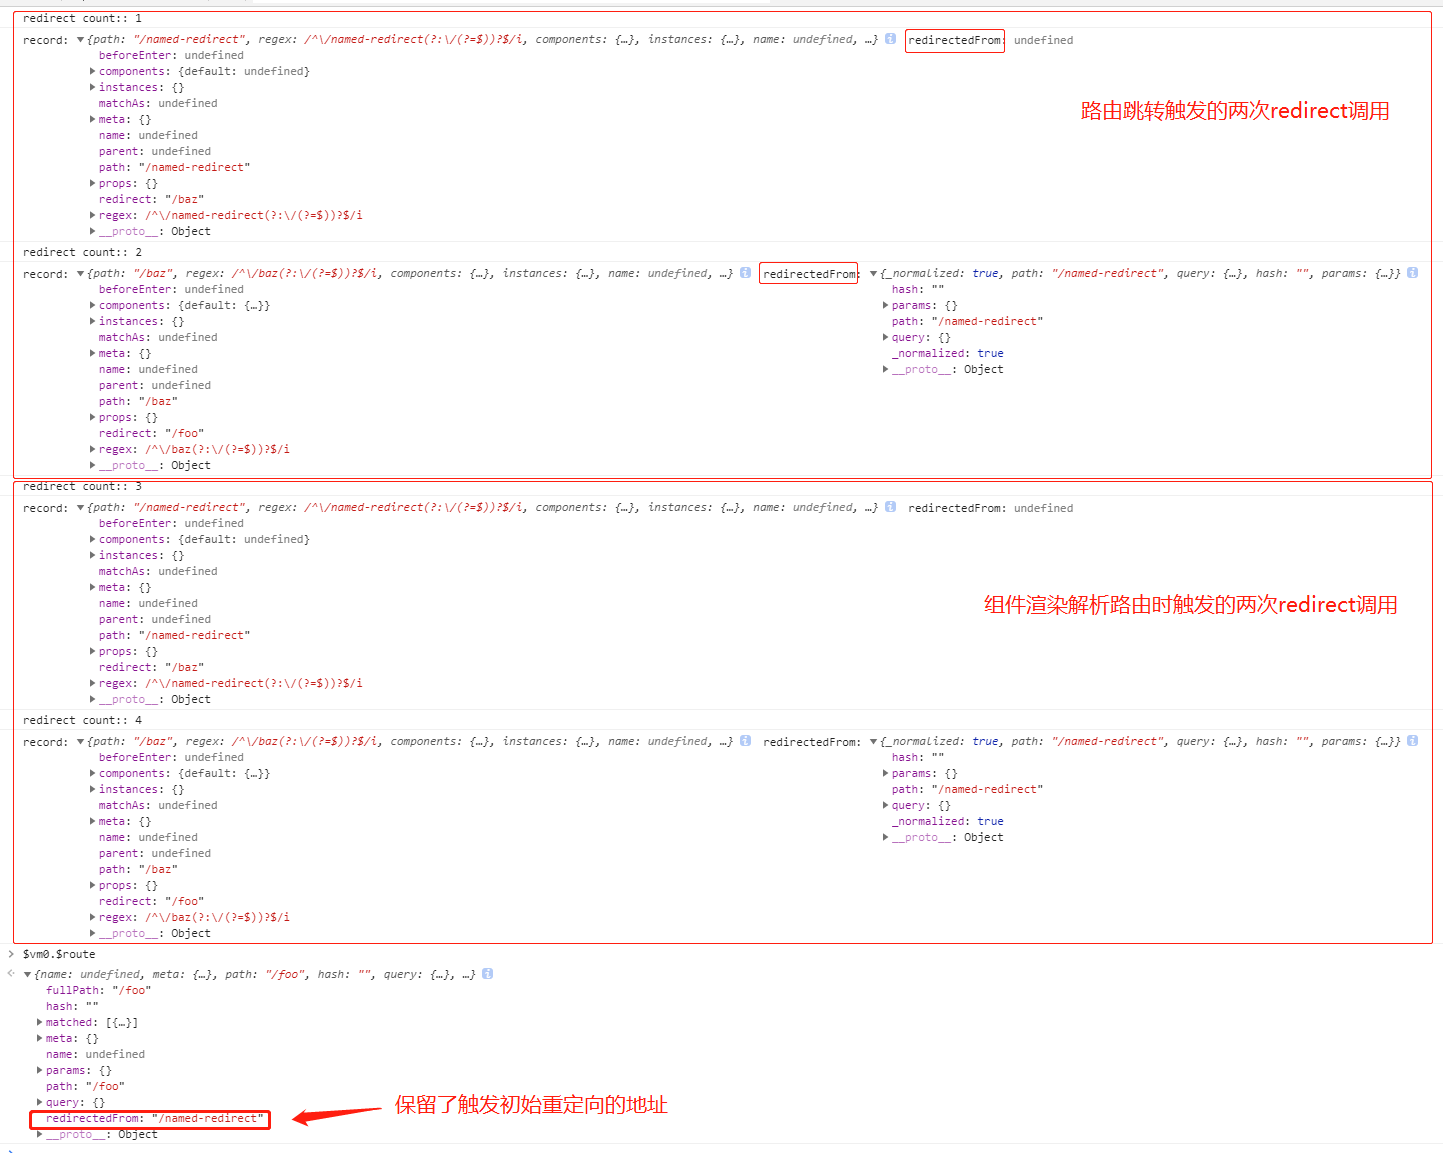
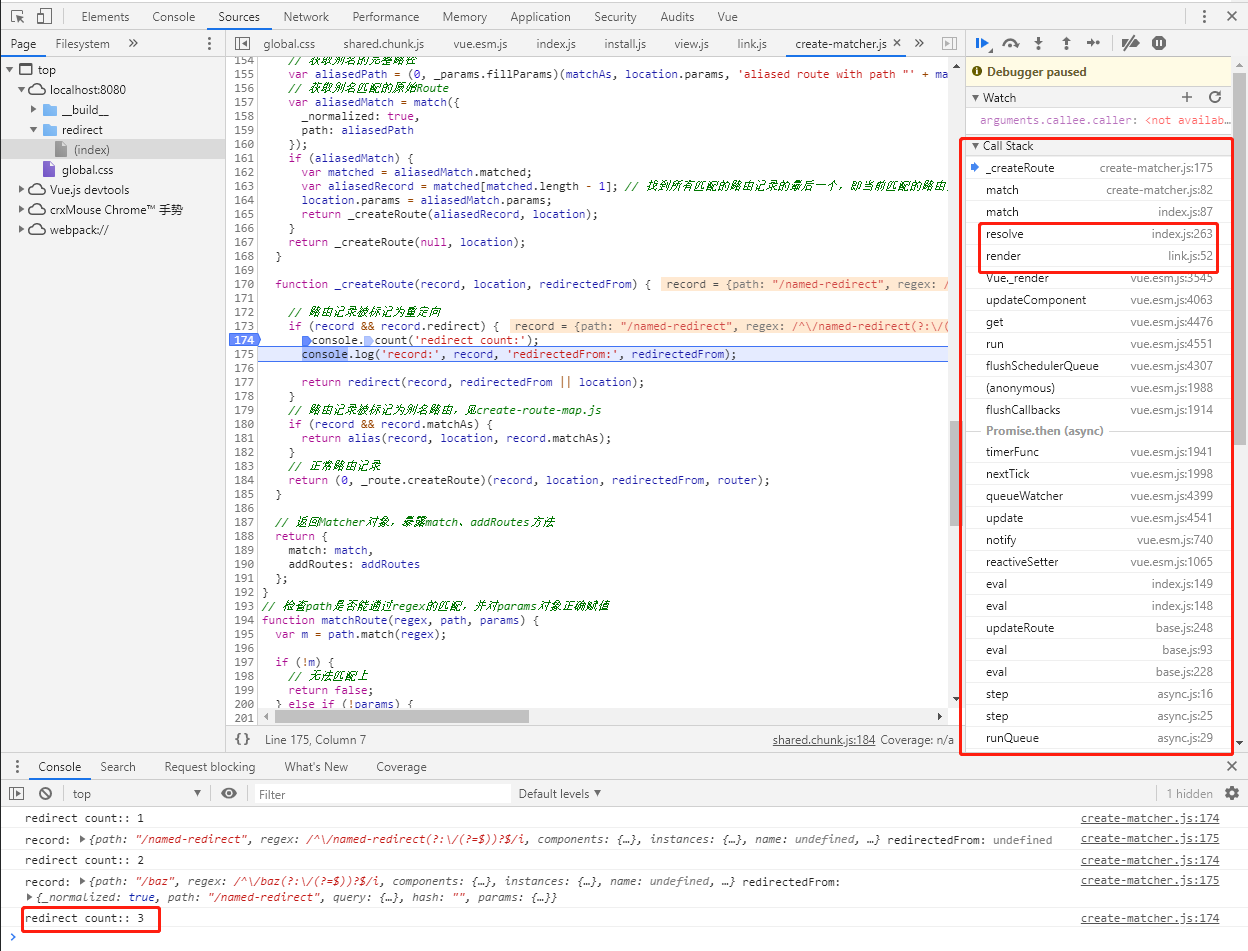
/named-redirect路由时(触发路由跳转),会重定向到/baz,/baz又会重定向到/foo,最终展示Foo组件;所以,redirect方法应该会被调用两次; - 我们可以看下上面例子的输出
- redirect-demo.png
- 会发现
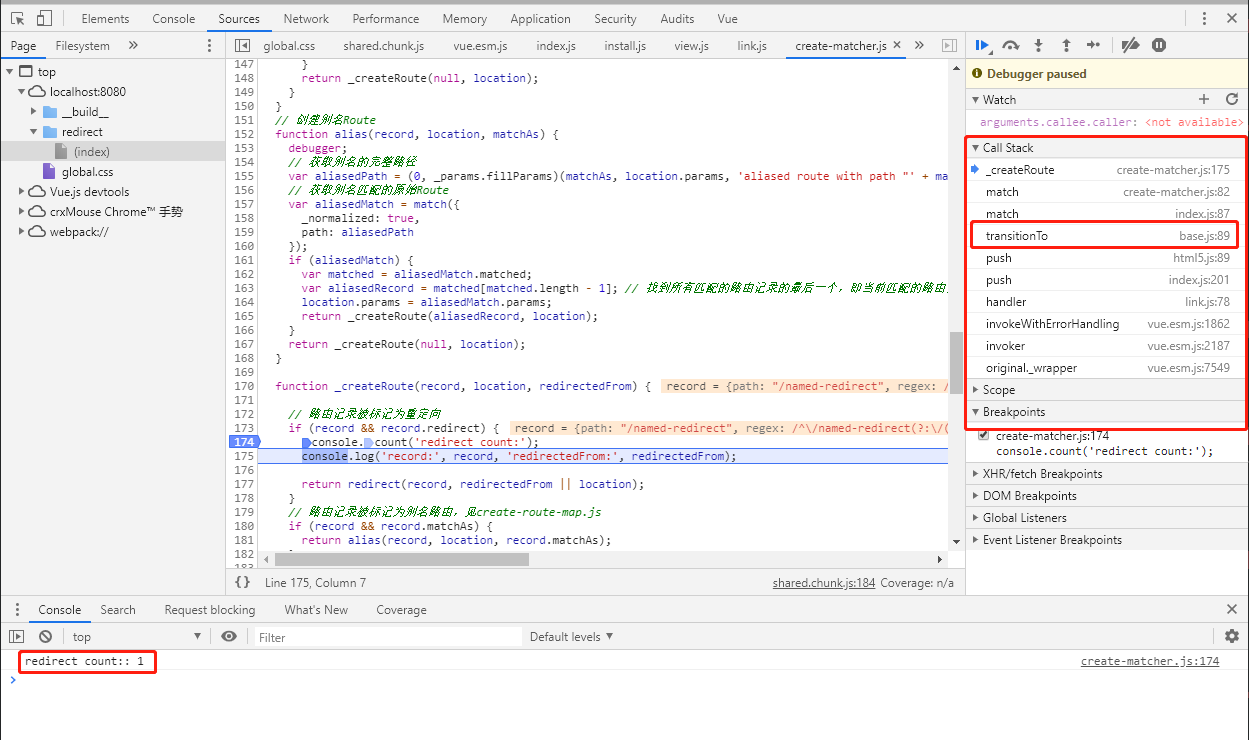
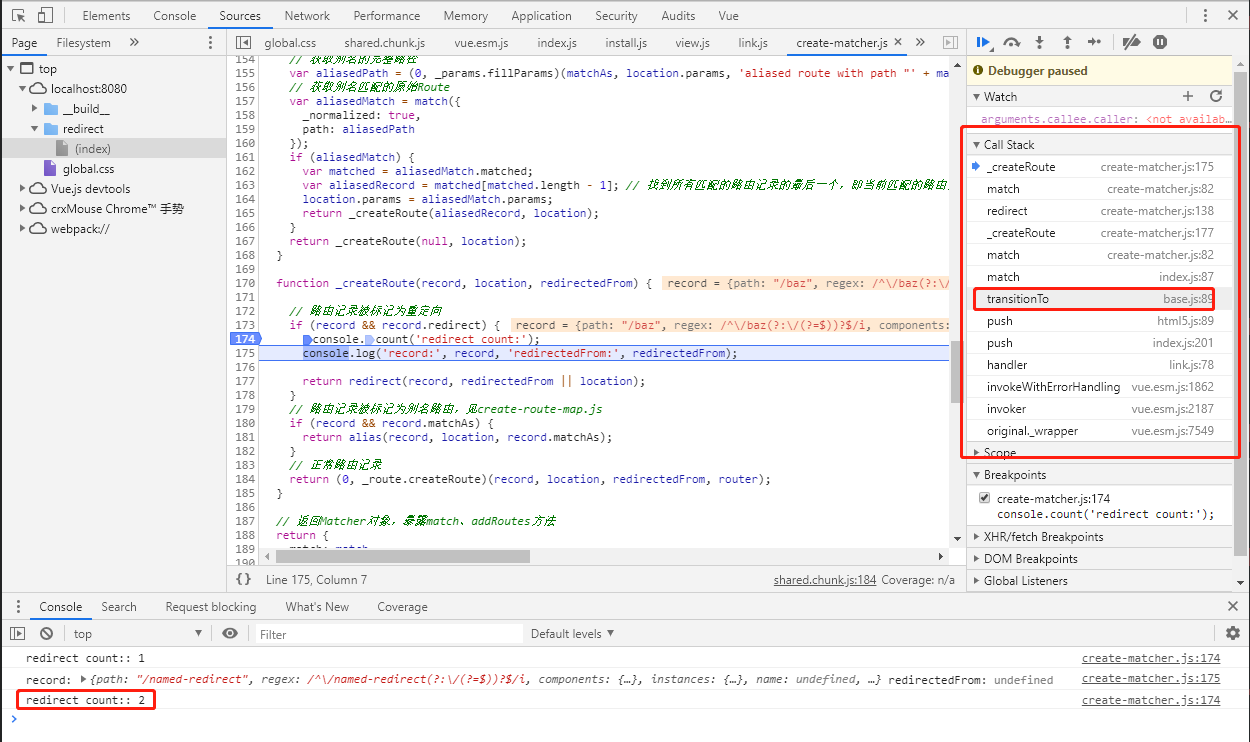
redirect方法被调用了四次,前两次是路由跳转导致的redirect调用,后两次则是组件渲染时,需要解析路由从而触发的redirect调用; - 可以对比下调用栈
- redirect-stack-1.png
- redirect-stack-2.png
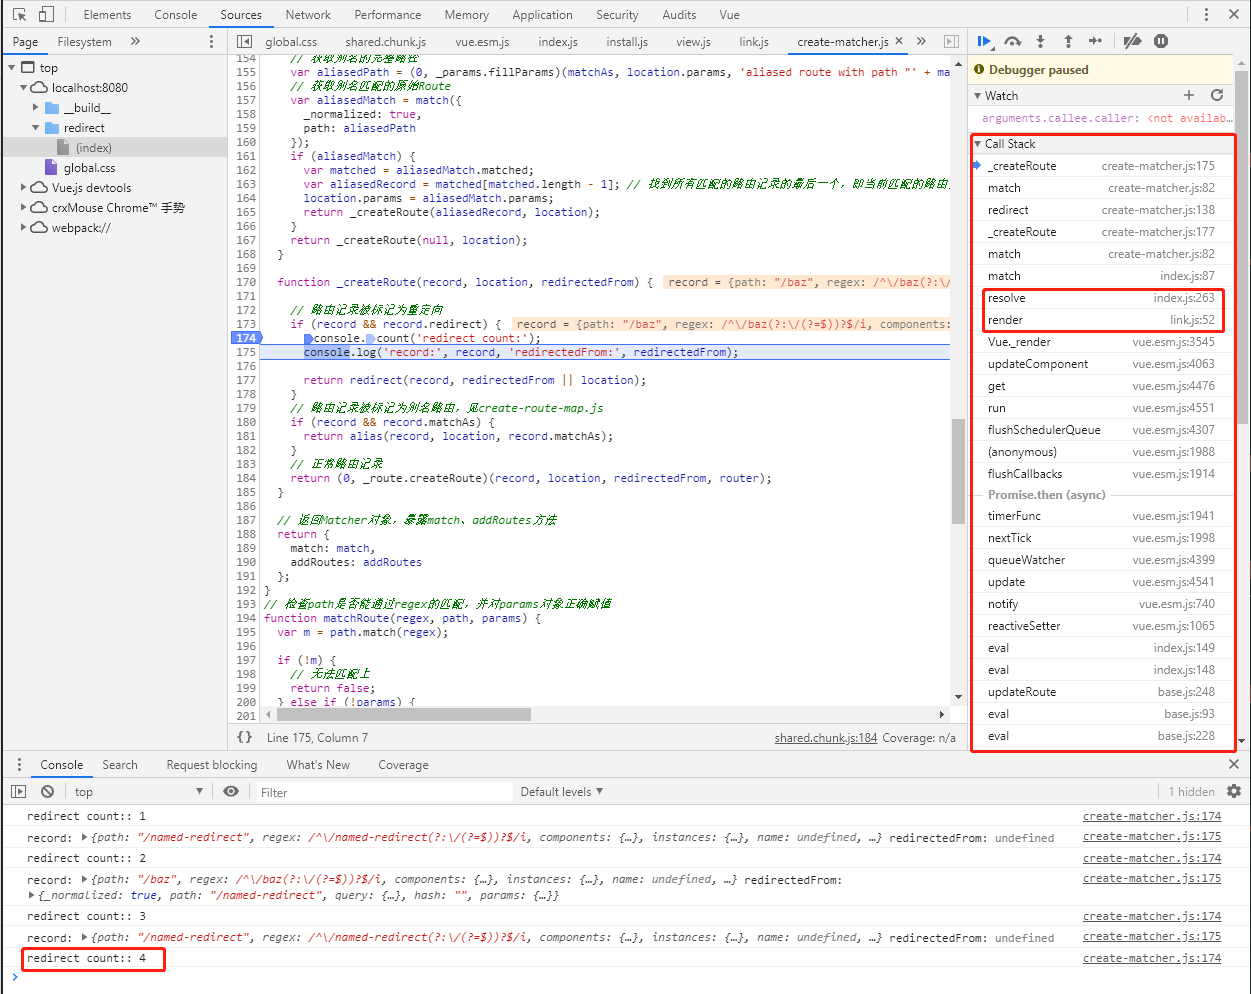
- 可以看到第一、第二次的
redirect是由transitionTo触发的 - redirect-stack-3.png
- redirect-stack-4.png
- 而第三、第四次都是组件渲染
render调用resolve触发的- 为何组件渲染时需要解析路由,这个我们在后面组件相关章节解释
- redirect-stack-1.png
- 可以看到第一次调用
redirect是从/named-redirect重定向到/baz,此时redirectFrom是没有值的 - 而第二次调用是从
/baz重定向到/foo,此时redirectFrom就是触发第一次重定向的地址/named-redirect - 而且最终的
$route上也会有个redirectFrom保留了触发第一次重定向的地址 - 上面我们只是看了
redirectFrom的意义,下面我们看看redirect的具体实现
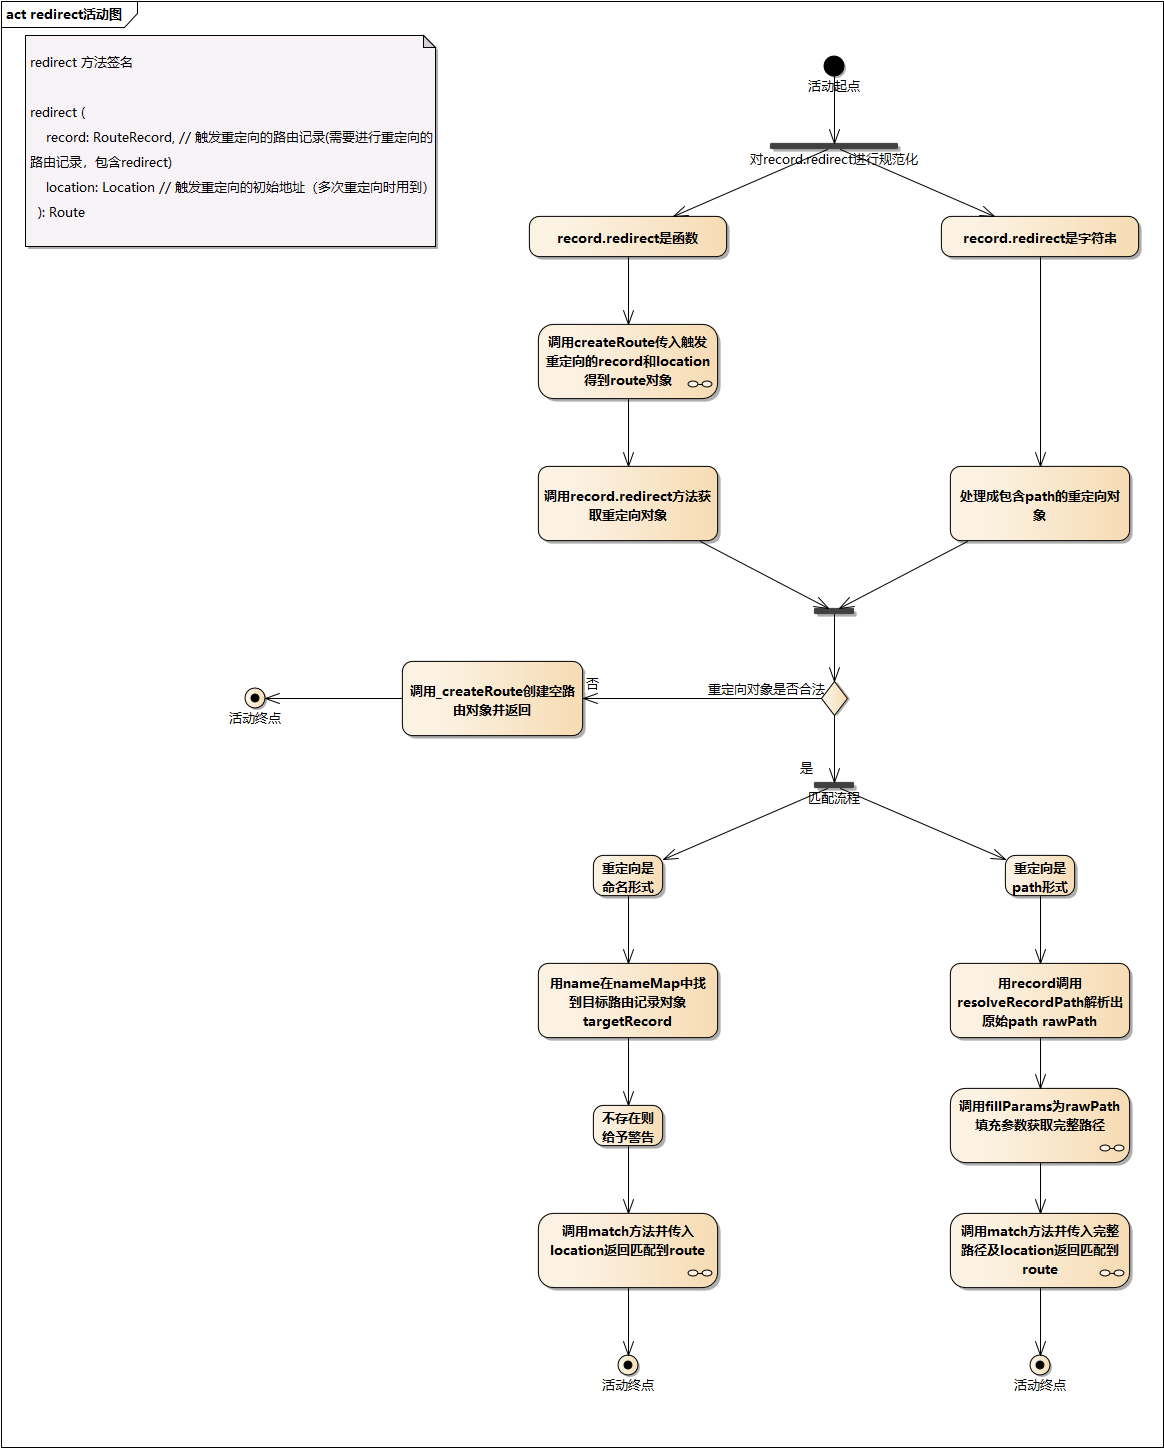
1 | // src/create-matcher.js createMatcher方法内 |
- 可以看到首先对
record.redirect进行规范化,统一生成一个redirect对象(重定向目标)- 为什么要进行规范化,前面也提过,
redirect支持字符串、对象、函数类型,所以需要规范化,方便后面统一处理
- 为什么要进行规范化,前面也提过,
- 接下来会优先取
redirect的query hash params值来做match,不存在时才会取初始地址location的query hash params - 接下来会判断重定向目标是
命名形式还是path形式 - 命名形式
- 先判断
nameMap中有没有目标路由记录,没有则中断,并给予提示; - 再重走
match流程,并将location做为redirectedFrom传入,这样就完成了redirectedFrom的传递闭环 match里面会继续判断是否有重定向,这样就覆盖了多重重定向的场景
- 先判断
- path 形式
- 拿
path匹配,需要获取完整路径,所以先从record拿出原始路径rawPath并填充前面解析出的params得出完整地址 - 再拿完整地址重走
match流程,同时也将location做为redirectedFrom传入,完成redirectedFrom的传递闭环 match里面会继续判断是否有重定向,这样就覆盖了多重重定向的场景
- 拿
- 如果既不是
命名形式也不是path形式,则直接创建一个新路由对象返回 - 流程如下
- redirect-full.png
小结
- 路由匹配的过程,其实就是拿
地址RawLocation生成路由对象Route的过程,这中间路由记录RouteRecord起中间桥梁的作用,因为路由记录上保存了生成路由对象的重要信息;所以流程应该是拿地址从路由映射表中找到对应的路由记录,然后拿路由记录生成路由对象 - 上述匹配逻辑主要由
match函数实现的,关键逻辑包含地址格式化normalizeLocation、地址是否匹配判断matchRoute、填充参数fillParams、创建路由对象_createRoute - 在
normalizeLocation时,会对rawLocation进行规范化,方便后续处理 - 在
matchRoute时,会借助path-to-regexp检测地址是否匹配并提取出params fillParams可以看做是提取params的逆向操作,主要用来对地址中的动态部分进行填充- 在
_createRoute时,会分别处理别名、重定向、多重重定向等场景 - 经过上述流程,就可以拿到
RawLocation对应的Route - 拿到
Route,我们就可以进行导航的解析
导航解析(确认)流程
- 前面提过在
transitionTo方法中,调用完match方法得到目标Route后,就会调用confirmTransition方法来做导航解析 - 我们知道
vue-router在路由跳转时,会按顺序触发各种钩子、守卫函数,例如beforeRouteLeave、beforeRouteEnter等等; - 首先这些钩子、守卫有的是定义在
vue-router实例上的,有的是路由独享的,有的是位于.vue组件中的,所以第一步必须抽出这些钩子、守卫函数统一处理 - 其次这些钩子、守卫是按顺序依次执行的,所以需要设计一个队列和迭代器来保证顺序执行
- 最后还有一些特殊场景需要处理,例如异步路由组件如何保证顺序执行
- 上述的相关逻辑封装在
confirmTransition中 confirmTransition方法被定义在src/base.js中
1 | // src/base.js History类中 |
- 我们可以先看下方法签名
route目标路由对象,需要解析的目标,可以理解为路由跳转时的to对象,而current则可以理解为from对象。onComplete跳转完成的回调onAbort取消、错误的回调
- 看下主要逻辑
- 首先处理了重复跳转的问题
- 然后通过对比找出需要更新、失活、激活的路由记录
- 从上述三种路由记录中抽取出对应钩子、守卫函数
- 将钩子及守卫函数放入队列中并执行
- 接下来,我们依次看下相关逻辑
判断重复跳转
- 在判断重复跳转前定义了
abort方法,它主要对onAbort方法做了一层包装;这个方法在导航发生取消时会被调用到- 它接收一个
err参数,如果有注册错误回调并且err为非NavigationDuplicated错误则遍历errorCbs列表执行其中的错误回调 - 最后调用
onAbort回调并传入err参数交给外部处理
- 它接收一个
- 接下来判断了是否重复跳转,主要利用
isSameRoute检测了当前路由对象和目标路由对象是否相同,若相同且二者匹配到路由记录数量相同,则视为重复跳转,此时调用abort方法并传入NavigationDuplicated错误并终止流程 isSameRoute主要判断了path、name、hash、query、params等关键信息是否相同,若相同则视为相同路由对象
1 | // src/util/route.js |
- 注意,在确定是重复跳转后,仍然会调用子类的
ensureURL方法来更新url
对比找出需要更新、失活、激活的路由记录
- 判断完重复跳转后,就需要对比
from、to路由对象,找出哪些路由记录需要更新,哪些失活、哪些需要激活,用来后续抽取钩子、守卫函数
1 | // src/history/base.js confirmTransition方法中 |
- 可以看到逻辑封装在了
resolveQueue方法中,传入了当前和目标路由对象的记录列表,从返回值中解构出了updated, deactivated, activated - 看下
resolveQueue实现
1 | // 对比curren、next的路由记录列表,找出需要更新、失活、激活的路由记录 |
- 逻辑很简单
- 首先找出
current和next列表长度的最大值, - 然后以此为循环最大次数循环找出首个不相等的路由记录索引
- 以此索引为分界线,
next列表当前索引左侧为需要更新的路由记录、索引及索引右侧的为需要激活的路由记录 current列表索引及右侧是需要失活的路由记录
- 首先找出
- 举例
current为:[1,2,3]、next为[1,2,3,4,5],当前路由对象包含1、2、3三个路由记录,目标路由对象包含1、2、3、4、5五个路由记录- 计算后
max为5 - 循环,发现首个不相等的索引为
3 - 所以需要更新的为
next.slice(0,3)即1、2、3 - 需要激活的为
next.slice(3)即4、5 - 需要失活的为
current.slice(3),没有需要失活的 - 找出了需要更新、激活、失活的路由记录,我们就可以从中抽取出对应的钩子、守卫函数
抽取钩子、守卫函数、解析异步组件
- 首先我们梳理下
vue-router有哪些钩子、守卫函数router.beforeEach全局前置守卫router.beforeResolve全局解析守卫(v2.5.0 新增)router.afterEach全局后置钩子RouteConfig.beforeEnter路由独享的守卫vm.beforeRouteEntervue 组件内路由进入守卫vm.beforeRouteUpdatevue 组件内路由更新守卫(v2.2 新增)vm.beforeRouteLeavevue 组件内路由离开守卫
- 可以看到有些是定义
VueRouter实例上的,有些是定义在配置规则RouteConfig上的,有些是定义在RouteComponent路由组件上的- 前两者的钩子、守卫是很容易获取到的,因为我们在
History类中持有了VueRouter实例,很容易访问到这些守卫、钩子并且几乎不需要做额外处理就可以直接执行; - 唯一不好处理的是定义在
RouteComponent路由组件中的守卫函数,需要借助RouteRecord拿到所有RouteComponent路由组件并从中抽取出对应守卫,最后还要为其绑定上下文,保证执行结果正确;
- 前两者的钩子、守卫是很容易获取到的,因为我们在
- 上节,我们已经拿到需要更新、激活、失活的
RouteRecord路由记录,我们看下分别要从中抽取出哪些守卫 deactivated中抽取beforeRouteLeaveupdated中抽取beforeRouteUpdateactivated中抽取beforeRouteEnter,这里存在一个特殊场景,就是异步路由组件,需要等待异步路由组件解析完成后,才能抽取beforeRouteEnter守卫,这个后面会讲- 我们先看下抽取的入口代码
1 | // src/history/base.js confirmTransition方法内 |
- 可以看到定义了一个队列
queue - 依次做了下面的事
- 抽取了
deactivated中的beforeRouteLeave守卫 - 获取了
VueRouter实例上定义的beforeEach守卫beforeEach守卫是直接定义在VueRouter实例上的
- 从
updated中抽取了beforeRouteUpdate守卫 - 从
activated中获取了路由独享的beforeEnter守卫beforeEnter守卫最初是定义在RouteConfig上的,后面又传递给路由记录,所以在路由记录上能直接获取到
- 解析
activated中的异步路由组件- 路由组件支持
import()动态导入,所以这里要处理
- 路由组件支持
- 抽取了
- 我们先看方法名很类似的
extractLeaveGuards和extractUpdateHooks
extractLeaveGuards、extractUpdateHooks
- 二者都位于
src/base.js
1 | // src/base.js |
- 可以看到二者内部都调用了
extractGuards,前者多传了一个参数true - 我们再看下
extractGuards
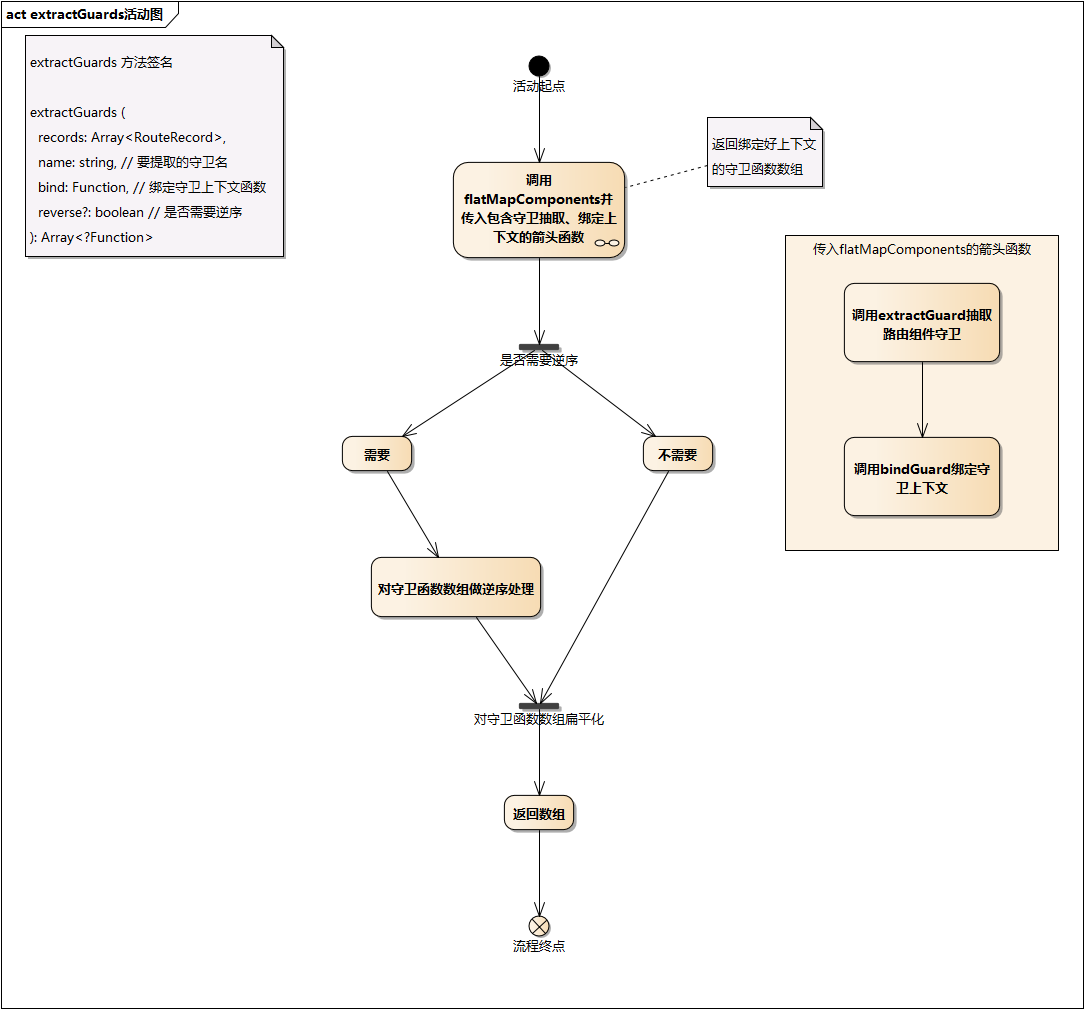
1 | // src/base.js |
- 看下方法签名
- 接收一个路由记录数组
records- 即
extractLeaveGuards中传入的deactivated路由记录数组;extractUpdateHooks中传入的updated路由记录数组
- 即
- 接收一个需要提取的守卫名
namebeforeRouteLeave和beforeRouteUpdate字符串
- 一个绑定守卫上下的函数
bindextractLeaveGuards、extractUpdateHooks传递的都是bindGuard方法,这个方法我们在下面解析
- 以及一个是否需要逆序输出的
reverse布尔值;可选参数;extractLeaveGuards传递的是true,代表返回的数组(守卫函数数组)需要逆序输出;
- 返回一个
item是Function的数组
- 接收一个路由记录数组
- 看下内部逻辑
- 调用
flatMapComponents传入records和一个接收def, instance, match, key参数的箭头函数,返回一个guards守卫数组 - 然后根据
reverse来决定是否对guards数组做逆序处理- 为何需要逆序?
- 在
createRoute章节也提过,在保存路由记录时是逆序的,精准匹配的路由记录在数组最后(length - 1位置),父记录在前 - 部分守卫函数需要逆序逆序执行,例如
beforeRouteLeave,它需要先在精准匹配的路由组件上调用,再在父组件上调用
- 最后调用
flatten将guards扁平化
- 调用
- 先看下
flatMapComponents实现
1 | // src/util/resolve-components.js |
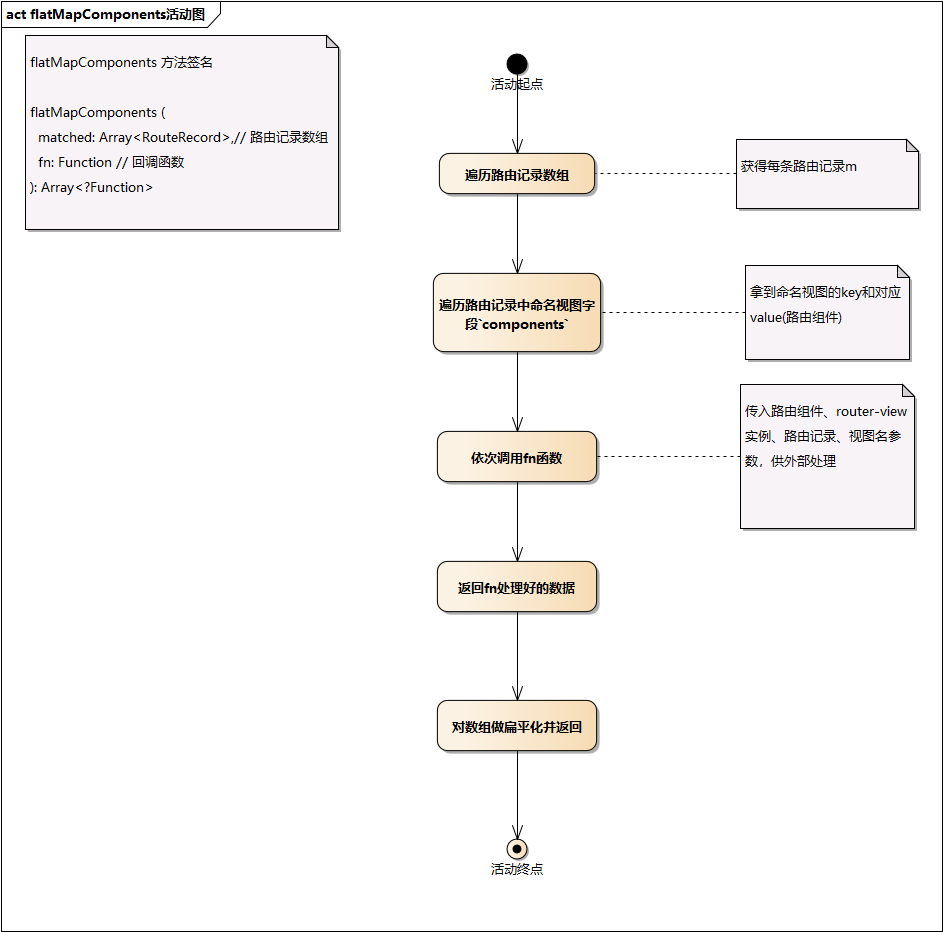
- 可以看到其接收一个路由记录数组
matched和一个函数fn,返回一个经过flatten处理的数组matched就是我们传入的recordsfn就是接收def, instance, match, key参数的箭头函数
- 这个方法主要是遍历路由记录中的每个路由组件并用其做入参依次调用外部函数
fn,返回结果由fn函数决定,最后将结果数组扁平化输出- 在解析异步组件时也会用到此方法
- 其会对传入的
records调用map方法,并遍历每个record上定义的components字段,并对components再次进行map遍历,然后调用传入的fn,map结果就是fn返回的结果 components字段是定义命名视图用的,长下面这样,key 为视图名,value 为对应路由组件
1 | components: { |
- 所以传入的 fn,即接收
def, instance, match, key参数的箭头函数的四个参数分别为def对应m.components[key]即路由组件定义(Foo、Bar、Baz)instance对应m.instances[key]是router-view组件实例,关于路由记录和route-view是如何关联的,会在介绍view组件时解析m对应的就是当前遍历到的路由记录key是当前遍历到的视图名
- 大体逻辑如下
- flat-map-components.png
- 我们看下箭头函数内部的逻辑
1 | const guards = flatMapComponents(records, ( |
- 首先调用
extractGuard从路由组件定义中直接抽取出对应name的守卫函数 - 接下来调用传入
extractGuards的bind方法为守卫绑定上下文 - 我们看下
extractGuard实现
1 | // src/base.js |
- 主要有两个逻辑
- 调用
extend以应用全局 mixins - 返回对应守卫函数
- 调用
- 提取完单个守卫后,就需要调用传入的
bind方法对其绑定上下文; bind方法其实是bindGuard
1 | // src/history/base.js |
- 经过上面的上下文绑定,从路由组件中抽取出的守卫函数就又回来到路由组件上下文中执行了,这样就保证了守卫函数无论在何处被调用,都能返回正确的结果
- 小结
extractGuards主要完成了从路由组件中抽取守卫函数并为其绑定上下文的工作- extract-guards.png
- 接下来我们要对激活的路由记录进行异步组件的解析
- 主要通过
resolveAsyncComponents方法实现的
resolveAsyncComponents
- 在看如何解析异步组件前,我们先看下
vue中的异步组件长什么样?
1 | // https://cn.vuejs.org/v2/guide/components-dynamic-async.html#异步组件 |
- 文档对异步组件的描述是
Vue 允许你以一个工厂函数的方式定义你的组件,这个工厂函数会异步解析你的组件定义 - 可以理解为:异步组件是一个工厂函数,函数内
resolve、reject组件的定义、返回一个Promise、返回一个带有特定标识字段的对象 - 解析路由记录中的异步组件代码位于
src/util/resolve-components.js
1 | // src/util/resolve-components.js |
- 可以看到其接收一个路由记录数组
matched,返回一个接收from、to、next的函数,内部是异步组件的解析逻辑 resolveAsyncComponents被调用时并不会执行解析异步组件的逻辑,因为其只会返回一个函数,返回的函数会在运行队列时才会被调用,这时才会解析异步组件- 队列的运行,我们后面再看,我们先看下返回的函数内部是什么逻辑
- 定义了一个是否有异步组件的标识字段
hasAsync、以及当前待解析的异步组件数量pending - 然后调用了
flatMapComponents拿到records中的所有路由组件,并依次调用传入的回调方法 - 回调方法会接收到被遍历的路由组件,此时需要判断这个路由组件是否是异步组件,如果是,则开始异步组件的解析,否则跳过
- 如果遍历结束发现
hasAsync仍然为false,代表没有异步组件直接next()进行下一步即可
- 定义了一个是否有异步组件的标识字段
- 如何确定某个组件是否是异步组件呢?
- 前面我们说过,在
vue中异步组件一定是个工厂函数,内部会调用resove、reject或返回Promise或返回特定格式对象,总之他肯定是个函数 - 其次
vue中每个实例都会有个唯一标识cid,如果有cid就代表已经生成相应实例,所以异步组件的cid一定为undefined - 所以判断是否是异步组件的依据就是
函数 && cid === 'undefined'
- 前面我们说过,在
- 如果判断是异步组件,则将
hasAsync置为true并让pending自增,代表有发现异步组件,在解析完组件后pending自减,当pending<=0则代表异步组件解析结束,可以调用next进行下一步 - 前面提过,
vue的异步组件工厂函数会接收resolve、reject两个方法并在从服务器得到组件定义后被调用; - 在接收到服务器返回异步组件的定义时,这两个方法会被传入异步组件工厂函数
- 由于异步组件工厂函数会返回一个
Promise函数或特定格式的对象,所以会有下面情况- 如果是返回
Promise,则将这两方法再传入返回的Promise.then中 - 如果返回特定格式对象,则找到
component字段,并将这两方法再传入component.then中
- 如果是返回
- 由于
resolve、reject已经被once包装,即使传入多次,也只会被执行一次 - 我们看下
resolve、reject方法 - 他们都被一个
once方法包裹以保证只会被执行一次 reject- 直接抛出一个错误并调用
next传递到下一流程
- 直接抛出一个错误并调用
resolve- 先判断下是否是
esm,若是,则取其.default字段来获取组件定义 - 拿到组件定义后,会先保留异步组件工厂函数,方便后续使用
- 然后替换路由记录的命名视图中的对应组件,这就完成了组件的解析并绑定到路由记录上
- 先判断下是否是
- 再次重申上面提到的逻辑都是
resolveAsyncComponents返回的函数逻辑,这个函数逻辑会等到队列被执行时才实际调用 - 至此,我们的队列
queue已经包含了抽取出来的守卫、钩子、包含解析异步组件逻辑的函数 - 队列已经构建完成,下面我们来看看它是如何执行的
守卫队列的执行
- 队列的执行是通过
runQueue、iterator相互配合来实现的
runQueue
runQueue方法位于src/util/async.js
1 | // src/util/async.js |
- 可以看到它接收一个队列
queue、一个迭代函数fn、一个执行完毕的回调函数cb - 内部是一个递归的实现
- 定义了一个
step函数并接收一个标识队列执行步骤的index - 必须通过手动调用
step才能跳到下一个队列项的执行- 在解析组件时会用到
- 当
index大于等于队列的长度时(递归的结束条件),代表队列项全执行完毕,可以调用cb - 否则,若还有队列项,则继续调用迭代函数
fn并传入队列项和跳转下个队列项的step(index + 1)函数 - 若无队列项了,则直接跳到下个队列项的执行
- 递归通过
step(0)来激活
iterator
- 迭代器相关代码好下
1 | // src/history/base.js |
- 可以看到其接收一个
hook也就是守卫队列中的守卫、钩子函数和next函数(runQueue传递过来的step函数) - 当在执行的过程中,路由发生变化,会立即取消
- 然后尝试调用
hook,并传入目标路由对象、当前路由对象、以及一个接收to的箭头函数 - 其实这三个参数就对应守卫会接收到的
from、to、next三个参数
1 | router.beforeEach((to, from, next) => { |
- 我们知道守卫的
next是一个function,并能接收下面几种参数以满足不同的路由跳转需求next(): 进行管道中的下一个钩子。next(false): 中断当前的导航。next('/')或者next({ path: '/' }): 跳转到一个不同的地址。当前的导航被中断,然后进行一个新的导航。你可以向 next 传递任意位置对象,且允许设置诸如 replace: true、name: ‘home’ 之类的选项以及任何用在 router-link 的 to prop 或 router.push 中的选项。next(error): (2.4.0+) 如果传入 next 的参数是一个 Error 实例,则导航会被终止且该错误会被传递给 router.onError() 注册过的回调。
- 上面接收
to的箭头函数就处理了上述几种场景 - 队列中的每一项都会在
iterator中被调用一次并通过next()到跳转到下一个队列项的执行 - 了解了
runQueue、iterator后,我们再来看看队列实际执行的代码是什么样的
队列执行
- 队列执行的完整代码如下
1 | // src/history/base.js |
- 可以看到,传入了队列
queue、迭代器iterator以及一个全部执行结束的回调函数 - 先回顾下
queue队列中有哪些元素beforeRouteLeave守卫- 全局的
beforeEach守卫 beforeRouteUpdate守卫beforeEnter守卫- 以及一个高阶函数,执行后会返回解析异步组件的函数
- 队列中的函数会在队列执行时依次在
iterator中被调用 - 前面几个都是已经提取出来的守卫函数,可以同步执行
- 但是最后一个高阶函数执行后,会返回一个解析异步组件的函数
- 其借助闭包的特性,能访问从
iterator中传入的from、to、next - 然后在解析完异步组件后调用
next,进入队列下一项的执行 - 这样就能保证,即使队列中有异步函数,也能顺序地将队列执行完
- 在整个守卫队列执行完后,就会执行结束回调
- 执行结束回调时,此时异步组件已经全部解析完毕,就可以抽取
beforeRouteEnter了
抽取 beforeRouteEnter
- 抽取
beforeRouteEnter和其它守卫稍微有点不同 - 因为
beforeRouteEnter所在的组件可能是异步的,所以beforeRouteEnter必须等到异步组件解析完毕才能开始抽取
- 因为
- 还有一个不同,就是在路由过渡动画为
out-in时,异步组件可能已经解析完毕了,但是router-view实例可能还未注册,此时是不能调用beforeRouteEnter的;具体见issue #750
- 还有一个不同,就是在路由过渡动画为
- 因为
beforeRouteEnter支持传一个回调给next来访问组件实例,就像下面这样
1 | beforeRouteEnter (to, from, next) { |
- 而这个
vm是保存在router-view实例上的,所以需要等到router-view实例存在时,才能调用回调 - 我们看下代码实现
1 | //src/history/base.js |
- 可以看到在调用
extractEnterGuards前 - 在外层声明了一个
postEnterCbs数组- 用来保存
beforeRouteEnter中传给next的回调函数,我们称为postEnterCb,也就是进入后的回调
- 用来保存
- 以及一个判断跳转是否结束的
isValid函数 isValid函数会被传入extractEnterGuards中extractEnterGuards中通过高阶函数形式返回一个包装了beforeRouteEnter的具名函数routeEnterGuard,其会在执行队列时被调用,并执行真正的beforeRouteEnter守卫guardguard在被执行时,会接收from、to以及一个被’改造’过的next,其接收一个postEnterCb- 这个
postEnterCb可能在将来需要访问vm - 所以将
postEnterCb用poll方法包裹塞入在外面定义好的postEnterCbs数组中 poll方法主要是用来解决前面提到的issue #750的,它会一直轮询,直到router-view实例存在时,再调用postEnterCb并传入挂载到router-view上的组件实例- 这样就实现了
next中能访问到组件实例的逻辑 - 抽取完
beforeRouteEnter守卫和其中的postEnterCbs后,又在queue后拼接了beforeResolve守卫
1 | const enterGuards = extractEnterGuards(activated, postEnterCbs, isValid) // 等待异步组件解析完,再抽取组件内的beforeRouteEnter守卫 |
- 此时
queue中是routeEnterGuard函数及resolveHook - 然后执行此队列,队列中的
routerEnterGuard和resolveHook会执行
1 | runQueue( |
- 执行的逻辑和之前类似,
beforeRouteEnter和beforeResolve会被依次调用,然后执行队列结束回调 - 队列结束回调中会调用
onComplete并传入目标Route并在$nextTick中遍历之前保存的postEnterCbs,即传入next的回调 - 此处的
onComplete是确认路由时(confirmTransition)传入的
1 | // src/history/base.js transitionTo方法中 |
- 可以看到其调用
updateRoute来更新route,这会触发afterEach钩子 - 调用
ensureURL更新 url - 并调用传入
transitionTo的onComplete函数,主要用来在vue-router初始化时为hash模式做初始化绑定(setupHashListener) - 最后触发通过
onReady注册的readyCbs回调
1 | // src/history/base.js |
updateRoute会调用History上通过listen方法注册的更新回调,触发roter-view的重新渲染- 这些更新回调是在
vue-router初始化时注册的
1 | // src/index.js init |
- 然后执行所有
afterEach钩子 - 至此一次完整的路由跳转完成,相应的守卫及钩子也触发完成
总结
- 整个导航的解析(确认),其实就是从不同状态的路由记录中抽取出对应的守卫及钩子
- 然后组成队列,使用
runQueue、iterator巧妙的完成守卫的执行 - 并在其中处理了异步组件的解析、
postEnterCb中实例获取的问题 - 整个守卫、钩子的执行流程如下
- 导航被触发。
- 在失活的组件里调用 beforeRouteLeave 守卫。
- 调用全局的 beforeEach 守卫。
- 在重用的组件里调用 beforeRouteUpdate 守卫 (2.2+)。
- 在路由配置里调用 beforeEnter。
- 解析异步路由组件。
- 在被激活的组件里调用 beforeRouteEnter。
- 调用全局的 beforeResolve 守卫 (2.5+)。
- 导航被确认。
- 调用全局的 afterEach 钩子。
- 触发 DOM 更新。
- 用创建好的实例调用 beforeRouteEnter 守卫中传给 next 的回调函数。
参考
- https://github.com/dwqs/blog/issues/53
- https://github.com/dwqs/blog/issues/54
- https://github.com/dwqs/blog/issues/55
- https://github.com/vuejs/vue-router/issues/2184#issuecomment-393484643
- https://juejin.im/post/5e456513f265da573c0c6d4b
- https://juejin.im/post/584040e1ac502e006cbedb23
- https://juejin.im/post/5df0ada0f265da33d56d1a2f
- https://juejin.im/post/5dbed0bef265da4cff701f68
- https://www.jianshu.com/p/29e8214d0bee
- https://ustbhuangyi.github.io/vue-analysis/v2/vue-router/
- https://blog.liuyunzhuge.com/2020/04/08/vue-router 源码:create-matcher/
PS
- 后面还会介绍其余部分,如果觉得还行,可以给个赞哦 ✨
- 个人
github,也总结了一些东西,欢迎 star - 基于 canvas 的绘图板drawing-board
- 前端入门 demo、最佳实践集合 fe-awesome-demos
- 一个自动生成别名的
vue-cli-pluginhttps://www.npmjs.com/package/vue-cli-plugin-auto-alias
npm 包
交流
- 如果有问题,可以加微信交流,共同成长,共同进步~